Thursday, September 27, 2012

Witchy Poo Halloween!

Hello, gel-a-tins fans! Jessi here, and today I am showing you another card using the wonderful Halloween stamp set, Witchy Poo! I am loving this stamp! There are countless options with this set!

Here is the card I made using the witch and bats stamps from the set:


Once I saw the flying witch, I knew that I wanted to create her with a full moon behind here. And to add some more details, I added the bats to the card. (Also, I added a foam dot to one of the bats to make it 'pop' of the card.


To finish the card, I added the sentiment.

Thank you for stopping by today! Please don't forget to join our blog and Facebook page to see more Gel-a-tins creations and to showcase your projects as well!

Have a great day!

Thursday, September 20, 2012

Hallo-scream Fun!

I cannot wait for Halloween! Just a little more than one month! Yippee! So meanwhile, let's get in the Halloween mood by making a card with Gel-a-tins "Witchy Poo" Stamp set!  This set is so much fun to work with!

 
I started with the background of the card. The spider web stamp was perfect for just that. To form the background, stamp the image over and over to cover the area.


The next stamp was to use the banner image included in the Witchy Poo Set two times to make detail that goes across the bottom.  I fussy-cut the banner out and adhered to the card.


 The last step is to add the sentiment onto a banner and add to the card.

This card includes lots of layers and to make them pop, I used foam dots to the layers.

Thank you for stopping by today! Hope you find some time to create! We would love to see what creations you make using Gel-a-tins!

Have a great day!
Jessi


Tuesday, September 18, 2012

Circles of Love for Lily Bee!

Happy Tuesday! I am excited to  share this card with you! I just finished it this morning and could not wait to share.

I love the Double Dutch Collection from Lily Bee Design and Spellbinders Circle Die-cuts:

 
I felt that the card needed some dimension, so I used foam dots on a few of the circles to make them POP off the card!
 
 
The sentiment is made using Lily Bee Alpha Stickers and a stamp from Stampendous. To finish the card, I added a couple brads and wrapped Trendy Twine around the bottom of the card.


Thank you for stopping by! Hope you have a great day!


Supplies:
Lily Bee Design - Double Dutch and Alpha Stickers
Spellbinders - Circles
Stampendous Sentiment Stamp
Trendy Twine - Kraft Twine
Foam Dots
Brown Ink


Playing along with the following challenge:
The Paper Shelter - Punch/die cuts
Simply Creat Too - Anything Goes

Sunday, September 16, 2012

Market Street BLOCK PARTY

So on this lazy Sunday, I managed to create a card for fun! It has been a hectic few weeks and it felt great to craft with no expectations! So I decided to join the September BLOCK PARTY at Market Street Stamps!

Using the Pawprints on Our Hearts stamp set from Market Street Stamps, here is the shaped card that I came up with:


I LOVE how this cute puppy turned out. I was attempting to use the back of the stamp to "color-in" the stamped image. But the stamp sort of caved in, resulting in the bare spot on the puppy's tummy. I thought that was a great look. So I found some paper with the light tan coloring and created this dog! The final touch was to paper-piece the ears.


The background is made using the pawprint stamp over, over and over again. Using Thicker letters, I spelled "WOOF" and used a small die-cut for the sentiment.

Supplies:
Marker Street Stamps - Pawprints on Our Hearts
Neenah Cardstock
Spellbinders - Labels Eight
AC Thickers Letters
Cloud 9 Designs - Going Places

Wednesday, September 12, 2012

Trendy Twine Fun and Sticky Fingers!

Happy Wednesday, Trendy Twiners! How are you liking the Chocolate Sprinkles projects so far?  I know I have added some to-dos to my list of crafty projects!

So when I was told the which twine would be spotlighted this month, my first idea was I wanted to make a twine bowl. My craft room is done in the blue/brown color combo.  And I needed a small container to hold little buttons or embellishments for whatever project I am working on.

Well, lets just say after multiple tries, I finally gave up on that idea. But I still needed a container. So off I went to the craft store and came home with a small glass vase.  After several twirls of twine and globs of mod-podge, here is my project:


It is time-consuming, but very simple to make! To finish the project, I wrapped Chocolate Truffle Twine a few times around and added the button. Viola!
 
Don't you just love the Chocolate Sprinkles color combo?! I do! Don't forget there is a chance for you to win this lovely twine! There is still plenty of time to join our September Challenge! Get the details HERE!
 
Thank you for stopping today!
Jessi
 
 
Supplies:
Glass Vase
Glue
Button 


Tuesday, September 11, 2012

Cheery Gel-a-tins love!

Happy Tuesday, Gel-a-tins fans! Thank you for stopping by! Today I am showcasing the new damask set that I am sure you will all love!
 
Yes, I know I said damask! But it shouts flower to me. Here is my card:
 
 
I choose do to the card in bright cheery colors. With it being a 'thinking of you' card, I figured it would brighten the recipient's day!


I absolutely love the quality of the Gel-a-tins stamps! It was so easy to stamp a crisp, solid image! To add another pop of color, I added yellow buttons to the 'center' of the flowers. The sentiment is stamped on a diecut and adhered using foam dots to add some dimension to the card.

Once again, thank you for stopping by today! I cannot wait to show you more project from this amazing stamp set!

Supplies:
Gel-a-tins Damask Stamp Set
Spellbinders Label Four
Misc. Buttons
Colorbox ink
Mohawk Cardstock

Tuesday, September 4, 2012

Yum, Chocolate Sprinkles!

Can you believe that it is September already?!? Where has this year gone? Have you started you holiday planning, yet? I have!

If you stop over at Trendy Twine, you will see the new spotlight twine of the month, Chocolate Sprinkles! I love the blue and brown combo! I love it so much, that is what my craft room is in!

Stop by HERE, to see the new September Project Challenge and to get the details!

Here is my project:


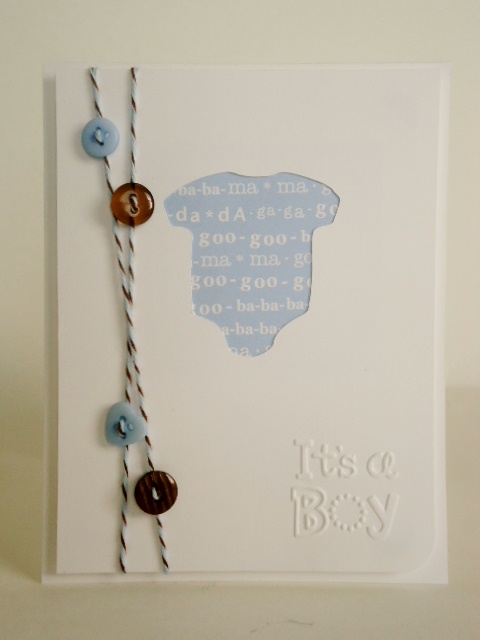
I decided to use my Slice machine to cut out the onesie. To add some texture to the card, I added dry embossing to the bottom corner. To finish the card I wrapped a few buttons on the twine.


The card can be easily switched for a baby girl!

Once again, thank you for stopping by! Up for a challenge? Join us for this monthly challenge!

Need more inspiration? Check out some DT projects HERE!

Have a great day!

Supplies:

Trendy Twine - Chocolate Sprinkles
Slice - Animal Crackers
Cuttlebug Embossing Folder
Misc. Buttons

Monday, September 3, 2012

Gel-a-tins Wedding Fun

Hello, Gel-a-tins fans Thank you for stopping by today! We are switching it up a bit today. With the fall approaching, the wedding fever starts to spread. With that in mind, I am showing you a simple, but elegant wedding invitation using our damask stamp set.


This stamp set would be perfect for any formal occasions coming up. Are you having a dinner party for the holidays? Need to send out cute invitations, but don't want to spend an arm and leg for them? Why not make your own!


I shared this tip before, but to make sure the image stamped crisp, I first used Versamark ink and then applied the choosen ink color to the stamp.

Once again, thank you for stopping by today.

Supplies:

Gel-a-tins Stamps - Damask
Mohawk White Cardstock
Bazzill Cardstock
Michael's Ribbon

Friday, August 24, 2012

Let it Snow in August...Please!

Looking for the Gel-a-tins Blog Hop? Click HERE!

Hello, Gel-a-tins fans! Thank you for stopping by today! So how many of you are ready for some cooler weather! I am dreaming of snow! I would love to wake up tomorrow morning to a blanket of the white stuff. But since we know that isn't going to happen, how about a card?

I love the snowflake gelly jr stamp! There are endless possibilities with this stamp!

I decided to fussy-cut the snowflake for this wintery card:


I embossed the polka dots on the front of the card. To highlight the dots to look like snow, I rubbed a white ink pad across the front. I attached a simple sentiment to the card. The final touch was adding the snowflakes (with silver brads in the center) to the card.


Once again, thanks for stopping by Gel-a-tins today! Please join us on our Facebook page and/or follow our blog!

Have a great day!
Jessi


Monday, August 20, 2012

Gel-a-tins Blog Hop

Hope you are having a blast with our blog hop! You should be arriving from Taheerah's blog. If not, feel free to start the Gel-a-tins blog hop HERE.

There are some amazing prizes that will be given away! Want to increase your odds of winning? Become a follower and leave comments on each blog participating in the blog hop. A winner will be drawn from each blog. Also a winner will be chosen from Gel-a-tins blog followers! Winners will be posted on the Gel-a-tins blog and on their Facebook page!

**Blog Hop ends Tuesday, August 28th at midnight PST**

I am having a wonderful time with Gel-a-tins Stamps! There are a number of possibilities to create! They have amazing stamp sets and even better, they come in their own storage tins!The quality of the stamps are awesome! The ink stays on the stamp and provides a crisp image each time.

Below our some projects that I have created with Gel-a-tins Stamp Sets!

Chevrontastic Set:

Honey Bear Set:

Gel-a-tins have also recently released New Gelly Jrs. They are fun single stamps! Here are some of my creations using the jrs,

Pine Tree Stamp:

Doodleflower Stamp:

Thank you for stopping by! Your next stop in the Gel-a-tins Blog Hop is Sharon!

All Gel-a-tins stamps are available HERE!

Have a great day!


Friday, August 17, 2012

Hi, Friend! - DCWV

Happy Friday, all! I am excited! I found time to make a card for FUN! I have tried for the past few days, but my creative mojo has not been present! I came across a challenge from DCWV and loved the sketch!

Here is my card, using the Songbird Stack:


Do you want to see the sketch? Here it is:


I loved how this card turned out. I was smiling as I was making it!


The only bad thing about crafting this card, now I am out of foam dots! Guess I will be making a trip to the store!


Supplies:
DCWV Songbird Stack Pack
Recollection Kraft Cardstock
Foam Dots


Thanks for stopping by today! I am off to create some more! While the mojo still exists!

Playing along with the DCWV August Stack-a-holic Challenge!

Other challenges:
Papertake Weekly - Spots & Stripes

Wednesday, August 15, 2012

So how old are ya?

Hello, everyone! Today I am showcasing the new 'No Sign' gelly jr's. When I received this stamp, I really wanted to fussy-cut the sign. But I was not very successful. (So, please share any projects that you create with this sign cut out!)

I created a card that can be taken a few ways. It can go to someone who is turning 30, but doesn't want to accept it. Or it can be given to someone who is over the age, but not admitting their true age.


Since I was not able to cut out the design, I ended stamping over the number stickers.


The 'happy birthday' sentiment is stamped around the 'No Sign'. I thought about leaving the white space alone, but decided to add a die-cut banner.

Thank you for stopping by! Have a great day!

Wednesday, August 8, 2012

Even birds are KRAZY for Twine!

Hello, Trendy Twiners! Thanks for stopping by today! As you may know we are featuring Krazy for Kraft for the month of August. Today, I am sharing a project with you out of my comfort zone! I decided that the Kraft Twine would be perfect for the roof of a birdhouse.

So here you have it:

And here is a closer look at the roof.

I spent almost the entire day trying to figure out how I was going to decorate the birdhouse. I tried flowers and could not get them to work for me. So I decided that I would add a simple banner on the front. (Of course, using the same twine to hang the banner.)

Once again, thank you for stopping by today! If you have the inspiration to make a project using twine, stop over and check out Trendy Twine's Monthly Challenge! Get the details HERE!

Have a great day!

Supplies:
Wooden Birdhouse
Trendy Twine - Kraft and Holly
Lily Bee Designs - Double Dutch
Paint


Tuesday, August 7, 2012

Trendy Beach Summer!

Hello, everyone! Thank you for stopping by today!  Over at Trendy Twine, the design is sharing their beach creations using Krazy for Kraft Twine. Please stop by to see some amazing projects that are sure inspire you!

Here is my creation:

I have been seeing the sun-bursts all over pinterest and knew that I wanted to use that in this creation! Also, I used washi tape to create the ocean "waves". To create the effect, I folded over the top of each row.

I love this definition stamp! I decided to stamp the words around the edge to create border around the beach scene.


Supplies:

Recollection Kraft Cardstock
Trendy Twine- Krazy for Kraft
Jillibean Soup Papers - Homemade 6 Bean Soup & Southern Chicken Dumpling
Trendy Tape - Blue Stripe
Dear Lizzy AC Stamp
Brown Ink

Hope you have a great day! Once again thank you for stopping by! If you feel inspired to create a beach project, please check out Trendy Twine's Monthly Challenge!


Playing along with the following challenges:
Creative Card Crew - On the Beach
Moving Along With the Times - Summer
Papertake Weekly Challenge- Anything Goes


Monday, August 6, 2012

Thinking of Holidays!

Happy Monday, everyone! Hope you had a great weekend! Can you believe that the holiday season is around the corner? Have you started to design your holiday cards? Is it too early? Never!

As you have seem before, the design team is highlighting the new gelly jrs. that have been released. There are a number of jrs that would be perfect for holiday cards! You have seen the pine tree before, but possibilities with this one stamp are endless! I love it!

I am in love with kraft and white ink! I think it is a beautiful combination! When I got my hands on the stamp, I knew exactly what I wanted to do!

Here it is:


This card is very simple to create! All I did was stamp the pine image sideways over and over in the stamp of the tree. I started on the bottom and created one row at a time. Once I had the tree created, I stamped a few more images to cover up the holes.  I finished the card with a simple sentiment and mounted the cardstock with foam dots to the card.

What do you think? This would make a great card with green ink and adding buttons as ornaments! I might have to give that a try!

Thanks for stopping by today! Please post any Gelatins creations of your own on our Facebook page! We would love to see them!

Jessi