Showing posts with label gelatins. Show all posts

Monday, May 6, 2013

Sparkly gel-a-tins Spring Rains

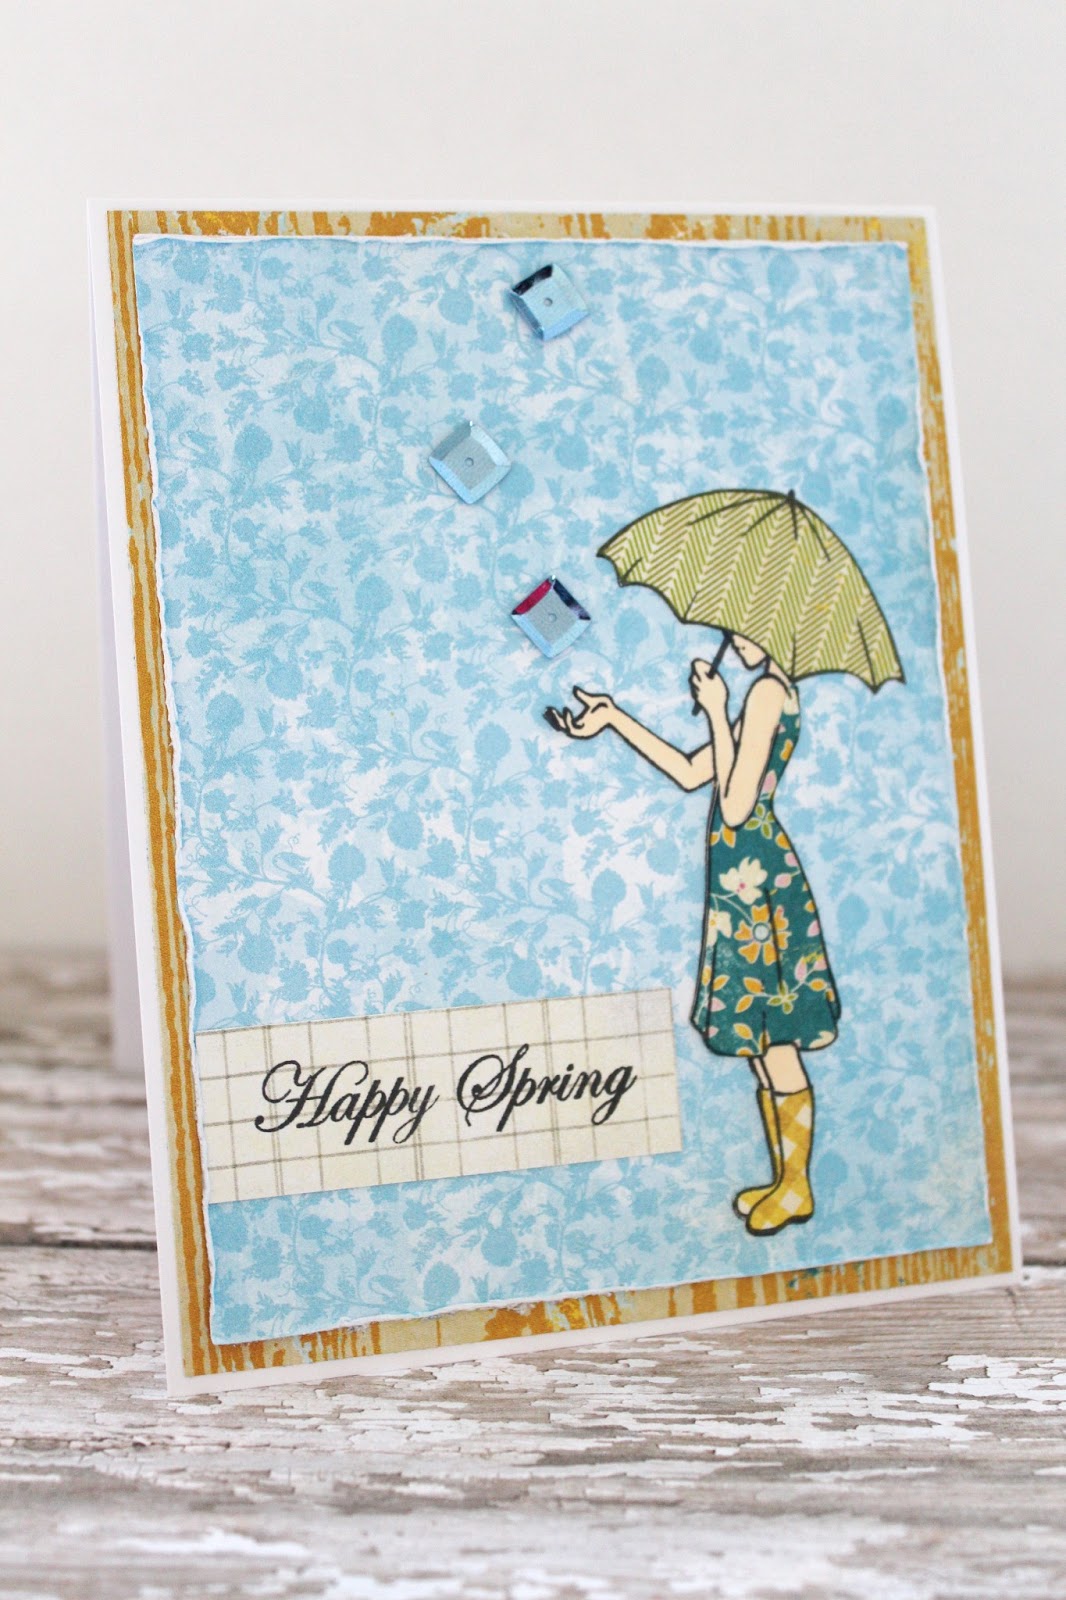
Hello, gel-a-tins fans! It's Jessi here and I am excited to share another card using the Raindrops are Falling and Easter Bunnies stamp sets!


Every time I see the woman/umbrella stamp from Raindrops are Falling, my crafting mind always leaning towards paper-piecing! This image is so adorable and perfect for that technique. To make the raindrops, I decided to use square shape sequins instead of the traditional raindrops. I love the extra sparkle!


Thank you for stopping by today! We would love to see your gel-a-tins creation! Have you 'LIKED' us on Facebook? More gel-a-tins inspiration can be seen on our Pinterest page.


Have a wonderful day!

Supplies:
gel-a-tins - Raindrops are Falling and Easter Bunnies
Authentique - Essesntials 6x6 Papers
Memento Ink - Tuxedo Black
Sequins

Playing along with:
Simon Says Stamp - Happy Mail
Tuesday, March 26, 2013

Easter Greetings from gel-a-tins!

Hello, gel-a-tins fans! Jessi here, from Kissin' Krafts. Today I have created an elegant Easter card using gel-a-tins' Easter Bunnies Stamp set.
 
 
 I used a cross die to create the diecut on the paper layer. To highlight the cross, I placed a piece of patterned paper under the diecut area. The Easter sentiment is stamp in brown ink below the diecut. One strip of patterned paper is added to the bottom of the card. The final touch was to add a few individual gems from gelly gem rolls to add elegant effect to the card.


Thank you so much for stopping by today! I hope you enjoy the rest of you week!
 
Lookin for more gel-a-tins inspirations? Stop by gel-a-tins Facebook page HERE!
 
 
Supplies-
Lily Bee Designs Buttercup Collection
Memento Rich Cocoa Ink
Neehah Cardstock


Friday, March 1, 2013

Sweet gel-a-tins Thank You

Hello, gel-a-tins fans! It is Jessi here from Kissin' Krafts. Today I am excited to share my newest creation using gel-a-tins products.
 
I would like to show you this card using gel-a-tins Sweet Hearts, Honey Bear and gelly gem roll-ups: 

 
To decorate the cupcake, I used black embossing powder to raise the edges of the outline. The frosting is made using puffy paint. Markers were used to color in the hearts and cupcake liner. Gelly gem roll-ups are made to look like sprinkles on cupcake.


This card is created using a variety of patterned papers. The sentiment (from Honey Bear) is stamped, repeatedly, onto one of the strips of paper.

Thank you for stopping by gel-a-tins! Check out gel-a-tins for the variety of stamps and gelly gems available!

Join us on Facebook to see more gel-a-tins inspiration and to get the latest news!

Supplies:
gel-a-tins - Sweet Hearts, Honey Bear and gelly gem roll-up - Silver
Lily Bee Designs and Dear Lizzy papers
Spectrum Noir Markers
AC Black Embossing Powder
Puffy Paint

Wednesday, February 20, 2013

Raindrops are falling!

Hello, everyone! It's Jessi here from Kissin' Krafts! I don't know about you, but I love the rain! And here in Texas, the spring tends to be the only time we really get any rain!
 
Here is the card I created using gel-a-tins, Raindrops are Falling Stamp set:

 
I absolutely love paper-piecing with stamps! As soon as I saw the stamp with the woman and the umbrella, I knew that was what I was going to do!


I created the 'window' by using a circle diecut and cutting the circle out of the patterned paper. The sentiment is stamped onto a different diecut and added using foam dots. Colorful twine is wrapped around the card to add another pop of red to the card.


Thank you for stopping by! If it happens to be raining where you are, hope you stay dry and find some time to create!

Need some gel-a-tins inspiration? Like us on Facebook!

Supplies:
gel-a-tins - Raindrops are Falling
Lily Bee Picket Fence Collection
Spellbinders Circle and Tag diecuts
Trendy Twine - Peppermint Stick Twine
Stazon Jet Black ink
Foam dots


Monday, February 11, 2013

LOVE is in the air!

Happy Monday, gel-a-tins fans! It's Jessi here from Kissin' Krafts! Can you feel the LOVE in the air? Valentine's Day is just around the corner! Are you ready for it?

Today I have a cute paper-piecing card to share with you:
 
 
Using the gel-a-tins, Love is in the air, and a variety of papers from Echo Park's This & That collection, I stamped the images on the patterned papers and hand-cut the images out. To include the birds' legs, I stamped the images on the cardstock and placed the paper pieces over the images. After the cut-outs were glued to the cardstock, I added the white cardstock onto a back layer of patterned paper. The final touch was the sentiment stamped onto a hand cutout cloud.


Thank you for stopping by today! Hope you have a wonderful day!

Like our Facebook page to find more gel-a-tins inspiration!

Supplies:
gel-a-tins - Love is in the air
Echo Park - This & That
Stazon Jet Black ink
Foam Dots

Friday, February 1, 2013

STOP in the name of gel-a-tins!

Hooray, it is February! Who else LOVES this month? Can you smell the LOVE in the air? It's Jessi from Kissin' Krafts and today I am excited to show this card that I made using the gel-a-tins STOP gelly jr. stamp!


I have always enjoyed the red, pink and aqua color combo and decided that this was the perfect card to make using those colors!

The STOP gelly jr stamp is stamped in pink and hand-cut. Using a variety of stickers and chipboard, I created the rest of the "sentiment". To add to the card, I used different embossing folders to add to the back layer and pink strip. The final piece to add was the simple twine,even though it is some what messed up in the picture ;)!

Thank you for stopping by today! Please share you gel-a-tins creations on our Facebook page, we would love to see what you come up with!

Supplies:
gel-a-tins - gelly jr. STOP sign
Recollection Kraft cardstock
Cuttlebug Embossing Folder - Seeing Spots
Paper Studio Embossing Folder - Woodgrain
Trendy Twine - Tickled with Teal
Lily Bee Design - Alpha Stickers
My Little Shoebox - Chipboard Letter
Misc. Chipboard heart


Playing along with CAS-ual Fridays - Love Letters

Wednesday, January 23, 2013

gel-a-tins LOVE!

Hello, everyone! It's Jessi here, from Kissin' Krafts! Can you feel the love in the air? With Valentine's Day next month, have you started you cards or projects yet?

I made a CAS card using the gel-a-tins Gingerbread House Set and Cheverontastic Set:

 photo 008-2_zps1673aaf3.jpg

I love the kraft, white and red combination, which makes it perfect for Valentine's! Using one of the Cheverontastic stamps to create the fun border at the bottom of the card. A red heart is added for a special POP. Foam letter stickers are used for the sentiment on the card. The last step is to round the corners of the card.

 photo 007_zpsc9c05ae2.jpg

Thanks for stopping by today! Check out our amazing stamp selection at our online store!


Monday, January 14, 2013

Honey Bear Love with gel-a-tins!

***See post for Prickley Pear CHA Blog Hop below***


Hello, gel-a-tins friends! Thank you for stopping by today! It is Jessi P. here and I am excited to share you a card using the Honey Bear Stamp Set.

I don't waste time skipping from Christmas to Valentine's projects! So I decided that the cute bear from the Honey Bear set would make a great card.

Here it is:

Photobucket
 
I stamped the bear in brown and used a variety of markers to color in the bear. (One New Year's Resolution for myself...learn to color with markers!!!) Next was to cut out the bear. I also cut a slit between the bear's arm and leg to slip in the twine as I put the card together.
 
Using a heart shape punch, I created the balloons by stamping the sentiment and using ink to color the hearts. Twine is attached to make the balloon strings from the heart to the bear;s hand.
 
The last step was to piece the card together. Using a patterned paper for the background.
 

Photobucket

Thank you for stopping by today!
 
Supplies:
gel-a-ins - Honey Bear Stamp Set

Friday, January 4, 2013

New Year Bling with gel-a-tins

Hope the New Year is treating you well! It's Jessi from Kissin's Krafts and I am going to share a CAS card that focuses on the gelly gem rolls. The gelly gem rolls are available in a variety of colors. Check out the store to see the colors.

Here is the New Year's card:

 
I used the gold gelly gem roll to highlight the year. A polka dot embossing folder was used to add dimension to the background. To draw attention to the dots, I stamped a dot image from the "Gingerbread House" set on thirteen random dots.

 
Thank you for stopping by today! Have a happy New Year!
 
Supplies:
gel-a-tins - gelly gem rolls (gold) and "Gingerbread House" Stamp set
Recollection Black Cardstock
Mohawk White Cardstock
EK Success Black Foam Stickers
Cuttlebug Polka Dot Embossing Folder
Memento Black Ink


Wednesday, December 26, 2012

gel-a-tins Warm Thank You

I hope everyone had a wonderful holiday! What do you on the day after? Shop? Clean? Create? I don't know about you, but I try to get my Thank You cards done quickly!

It's Jessi here and today I am sharing a warm Thank You card using a couple stamps from a couple of different gel-a-tins sets.

 
I choose to paper-piece the house from the Gingerbread House Stamp set. Once the house was complete, I used puffy paint to add the snow to the house. The final touch was to add the wreath and gold gem accents (from the gelly gem rolls).
 
 
The sentiment (from the Honey Bear Stamp Set) was stamped onto the banner. The first part of the sentiment was done using a variety of letter stickers. The banner was attached to the card using foam dots.
 
 
Thank you for stopping by today! Hope you have a grand day!


Supplies:
gel-a-tins - Gingerbread House Set, Honey Bear Set and gelly gem roll
Recollection Kraft Cardstock
Echo Park - This and That
Lily Bee Alpha Stickers
My Little Shoebox chipboard letter
Memento - Rich Cocoa Ink
Fiskars Snowflake Punch
Puffy Paint


Friday, December 7, 2012

gel-a-tins Cheveron Ornament

Hello, gel-a-tins fans! It's Jessi from Kissin' Krafts and I am excited to share this project with you! (I might be so addicted I will probably be making more soon!) I am stepping away from my normal cards today and sharing with you an ornament I made for Christmas trees.

I used Cheverontastic for this project:


I made the dough (similar to salt dough (but made with baking soda and cornstarch) and rolled it out like I was making cookies. The next stamp is to stamp the dough. (You can do this two different ways. You can stamp the dough and then use cookie cutters or vice versa. I like cutting the dough and then stamping). Make sure to use a straw to make the hole at the top of the ornament. And bake away.


I loved how these turned out. This was the first batch that I made, so it was a learning process. I did have to throw away half the batch due to cracking. But hopefully, I have learned the cause and know now how to fix.

Thank you so much for stopping by today! Have a great gel-a-tins day!

Don't forget to join our Facebook page for the latest news and information!


Supplies:
gel-a-tins - Cheverontastic
Dough
Ribbon

** I found the recipe during one of my Pinterest searches! Here is the blog that includes the recipe:
http://woodsidekitchen.blogspot.com/2010/11/clay-christmas-decorations.html

Tuesday, October 30, 2012

gel-a-tins Thanksgiving!

I know that Halloween is this week, but I decided to make a Thanksgiving card using the amazing gel-a-tins Damask stamp set.  I have always thought that gold was the perfect color to celebrate Thanksgiving.

Here is the card that I created-

 
I used the bigger damask stamp to create the background of the card. The small damask added the perfect touch to the sentiment. 
 

Are you planning a big Thanksgiving dinner or a Holiday party? Need to send elegant invitations? The gel-a-tins Damask Stamp set is perfect for the occasion!

Thanks for stopping by!


Monday, October 22, 2012

Eeeeek...too cute!


*Coming from Prickley Pear? Please scroll down if you are looking for my Prickley Pear Post!*
 
 
Hello, Gel-a-tins fans! Can you believe that Halloween is next week?!? So why not another festive Halloween card?  Today's card using the single stamp Fall Kitty and the bat stamps from the Witchy Poo Set.

Take a look-
 
The first step I took in making this card was to stamp the Fall Kitty image onto kraft cardstock. I colored in the image with a variety of markers. Once the ink was dried, I hand-cut the image. I adhered the patterned paper to the card and used a die-cut to cut out the circle on the front.  Using the same die-cut, I also cut a circle out of matching orange cardstock and attached to the "inside" of the card.  
 
 
It was time to start piecing together the card. I stamped one bat onto the orange circle. The second bat was hand-cut and adhered to the piece of twine. The kitty was glued to the front of the card off to the side of the circle cut-out. I decided to add sticker embellishments to bottom and viola, the card is finished!

 
Thank you for stopping by Gel-a-tins today! Please share your Gel-a-tins projects on our Facebook page!

Also playing along with the folloing challenges:
Simon Say Stamp - Picture Inspiration
Pile It On  - Holidays, Any Holidays
Inspired by Stamping - Photo Inspiration

Saturday, October 13, 2012

Gel-a-tins Haunted House

I am loving all the Halloween projects the talented gel-a-tins DT has been showing you! Of course, I have decided to another Halloween card using the Witchy Poo Stamp set and a touch of the Chrevrontastic Set.

Hope you like it!


A close-up of the bats and house from the Witchy Poo Stamp set.


To add a splash of orange to the card, I decided to use the Chrevrontastic set to help highlight the haunted house.  And of course, I decided to use a few of my favorite foam dots to add dimension to the card. (The moon and the sign pop off the page.)

Thank you for stopping by today! If you have any gel-a-tins creations, please share them with us and then think about trying out for our current DT search! You could be on the next team!

Have a great day!

Friday, October 5, 2012

BOO with Witchy Poo

Are you enjoying all the Halloween projects the talented design team has been sharing? I know that I am!

Today I have another project for you using the Witchy Poo stamp set.


When I saw these ghost shape cards, I instantly visioned the ghost holding a banner. So I stamped the Witchy Poo banner and cut the banner out. I also stamped the spider webs and attached stickers to spell B-O-O. The final touch was adding the twine bows.


Thank you for stopping by Gel-a-tins today! Please share any of your Gel-a-tins projects with us on our Facebook page.


Thursday, September 27, 2012

Witchy Poo Halloween!

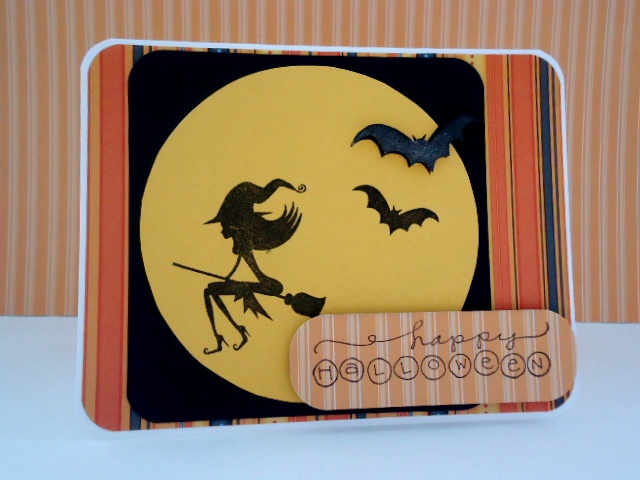
Hello, gel-a-tins fans! Jessi here, and today I am showing you another card using the wonderful Halloween stamp set, Witchy Poo! I am loving this stamp! There are countless options with this set!

Here is the card I made using the witch and bats stamps from the set:


Once I saw the flying witch, I knew that I wanted to create her with a full moon behind here. And to add some more details, I added the bats to the card. (Also, I added a foam dot to one of the bats to make it 'pop' of the card.


To finish the card, I added the sentiment.

Thank you for stopping by today! Please don't forget to join our blog and Facebook page to see more Gel-a-tins creations and to showcase your projects as well!

Have a great day!