Friday, July 28, 2017

Let's Have Adventure

Hello, MarkerPOP friends! Do you like adventures? I would like to say that I do. But I have found that as I get older, my adventurous level is decreasing! We are taking the kids to their first waterpark in a few weeks. This will be my second time ever to one. I am sort of freaking out!

Today's card features the Sugar Peas Design's Lantern die and RV There Yet:


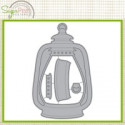
The lantern die cut is made using black cardstock. I also ran the die with white cardstock to get the center piece. The center piece is colored in using Distress Crayons. I blended them with a baby wipe. Once the cardstock is dry, I stamped the phrase onto the white cardstock. The lantern is attached to a starry print.


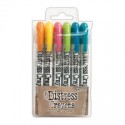
I used the following Distress Crayons: Spiced Pumpkin and Mustard Seed.


I love this lantern! Makes me want to go on a camping adventure...maybe when the temperatures cool down!

Thank you for stopping by! Have a wonderful day!

Jessi
 

Thursday, July 27, 2017

Hello Gorgeous


Hello, friends! Can you believe that July is almost over?!? School starts back up in less than one month. What have you been doing to fill up your days? We finally took the family to the beach today. First time this year and then we realized we never went last year. So hopefully, we can sneak in one more trip before school starts!

Today I am working with the Waffle Flower's Pretty Foliage and Chameleon markers:


So I was a little late to the MISTI fan train. I have it for some time now and just recently found out how awesome the system is! I love how you can stamp the image in the same spot repeatedly for crisper lines. Once the ink was dry, it is time to color in with Chameleon markers. I tried to use colors from the fun print below.


Once the images were colored in, the sentiment is add in the top left corner. The sentiment is colored in using orange and yellow. The panel is then attached to the printed paper and then attached to the card base.


The following Chameleon markers were used on today's card:
RD2, RD4, YG3, GR3, GR4, OL3, YL2, YO2, OR3, OR4, PK3

Thank you for stopping by! Hope you have a wonderful day!!!
Jessi

Tuesday, July 25, 2017

Joy Clair is Hopping with Quick Quotes


Hello, Joy Clair friends! This is a super fun week on the Joy Clair blog. We have teamed up with Quick Quotes for a week long promotion. The design teams from both companies are sharing a variety of projects in hopes to inspire you to get crafty!

Image may contain: text

When I received my Quick Quote papers and embellishments, I figured it was time to attempt another scrapbook layout. I decided to highlight the anchors that are included in the Anchors Aweigh collection. I used a few different Joy Clair stamp sets on this layout: Soft Letters, Anchors of Hope and Bible Planner.


A few different prints from the Anchors Aweigh collection were used for layers on the layout. I really wanted to highlight the anchors, so I decided to use a large piece of the navy/white anchor print to go across the page. The title of the page is created using a mixture of stamps and stickers. The word 'anchor' is created using letters from the Soft Letters stamp set. The letters are stamped onto a print and cut out.

Multiple pieces of the chipboard embellishments from the Anchors Aweigh collection are also used on the layout. The picture is highlighted with the chipboard photo corners. A couple worded embellishments are used as extra detail. To break up some of the empty space, I used a sticker saying that is also part of the Anchors Aweigh collection.

One of the last details of the layout is the peach anchor. I used the anchor from the Anchor of Hope stamp set and stamped it onto the paper. Once the image is cut out, I poked a hole in the top and placed a string of white twine. I looped the twine around the page by gluing sections of the twine to the paper. To finish the page, I used the numbers from the Bible Planner stamp set to stamp the date onto the bottom of the layout.

Let talk about prizes! All you have to do is leave comments of the Quick Quote blog and the Joy Clair blog throughout the week to increase your chance of winning. The winners will be announced on the companies' blogs.

Thank you for stopping by and have a wonderful week! Please make sure to stop by and check out more of the Quick Quotes and Joy Clair Cross Promotion!

Jessi

Supplies:
Trendy Twine - Totally White
Variety of Stickers

Thursday, July 20, 2017

Aloha Pineapples!

Hello, MarkerPOP friends! Pineapples are really popular right now! They are everywhere! Stamps...Papers...even Home Décor! I love them!!! So when I saw the super cute Lawn Fawn's Aloha stamp set, I had to have it!!!

I decided to pair up the stamp set with Chameleon markers and used the no-line technique:


The pineapple image is randomly stamped across a blank card. I used a light colored ink, so it 'disappears' once the image is colored in. The stem of the pineapples were colored in first. The Chameleon markers YG3 and GR3 were used. The body of the pineapple were colored in with the YL2 and YO3 markers.


To fill the empty space on the card, I stamped the 'aloha' word across the card. To finish the card, I used a brown fine tip pen and added the spikes to the pineapples. 


Who loves a giveaway? Click HERE to get more details!

Thank you for stopping by! Have a wonderful day!

Jessi


Monday, July 17, 2017

Joy Clair's Christmas in July Celebration

Welcome to the Christmas in July Celebration with Joy Clair! This week the design team is showcasing the different Christmas stamp sets available in the Joy Clair Store! I know that Christmas is still a few months away...but it is never too early to get your Christmas crafts underway!

Today I am showing one of the first ever Joy Clair's Christmas sets, Christmas Wishes:

Christmas Wishes Clear Stamps - Joy Clair - 1

When I first saw this set, I fell in love with the cutesy tree and the adorable handwritten words! I wish my cursive was that pretty!


I really wanted the tree to be the highlight of the card. I took a decorative panel and stamped/embossed the tree in gold. To add to the tree, I stamped ornaments onto the tree using the small dot stamp from the set. The star is colored in with a yellow marker. The decorative panel is layered onto a few different prints and attached to the card front.


For the inside of the card, the sentiment is stamped in black ink. I decided to add the decorative lines to the top and bottom of the sentiment. The lines are also stamped/embossed in gold.

There is a special sale going on during our Christmas in July event! From July 17 - 21, there will be a 10% off sale on all Joy Clair Christmas stamp sets. You will need to use the special discount code CIJ17 to receive the sale price.

Hop on over to the Joy Clair blog to see more projects.

Are you interested in learning the latest news going on with Joy Clair? Join us on your favorite Social media sites to see our newest products and samples from the design team members.

Thank you for stopping by! Hope you have a wonderful day!


Supplies:
Joy Clair - Christmas Wishes
DCWV - Cranberry Stack
NUVO Gold Embossing powder
Distress Ink - Candied Apple
Memento Tuxedo Black Ink

Thursday, July 13, 2017

Happy Birthday Bus

Hello, MarkerPOP friends!!! July is a busy birthday month in my family. Do you have a certain month of the year that has more birthdays than others? Another month for us is May.

Today, I am working with the Avery Elle's Birthday Bus stamp set and Chameleon markers:


To start this card, I stamped the van image onto white cardstock. The line for the road is drawn in with a black tip pen. I decided to add the presents to the top of the car and balloons above the card. I also used the black tip pen to draw in the balloon strings. To finish the scene, I added a couple exhaust puffs to the van. The sentiment is stamped at the bottom of the card in the center.


I used lots of Chameleon markers to color in the scene, I started with the balloons and worked my way down the card, saving the van for last. To finish the card, I added a some white gel marks to each of the balloon.


The following Chameleon markers were used on today's card:
NU1, NU2, NU4, BR2, BR4, BR5, YO2, YO3, YL2, BG4, BL2, BL3, BL4, PR4, YG3, GR3, RD2, RD4, BK4, CB, OR4, PK3

Please stop by the MarkerPOP blog to see the entire supply list.

Thank you for stopping by today! Have a great one!

Jessi

Friday, July 7, 2017

Birthday Wishes

Hello, MarkerPOP friends!  Sorry for the late post today! But better late than never, right?

Today, I am working with a super adorable set from WPlus9 Design. The Modern Peonies set is full of floral images that are perfect for several special occasions. 


The floral images are stamped onto watercolor cardstock. I used the masking technique to make it look like one flower is in front of another one. The flowers are colored in with ZIG Clean Color markers. The panel is attached to a foiled print. To bring out the gold, I decided to emboss the sentiment with gold embossing powder. The sentiment is cut into strips and attached on the front og the card.


The following ZIG markers were used on today's card:
020, 022, 041, 047, 065, 070


Please stop by the MarkerPOP blog to see the entire supply list for today's card.

Thank you for stopping by today! Have a great day!

Jessi

Thursday, July 6, 2017

Let's Meat Up

Hello, MarkerPOP friends! I hope everyone had a wonderful 4th of July celebration! Who all BBQ'd? I know that we did...hot dogs and ribs! Yum!!! So with that in mind, I thought this week would be a great week to showcase Waffle Flower's Meat It Up stamp set.

I paired up the Meat It Up stamp set with Chameleon markers:


All the images I wanted to use on the card were stamped onto white cardstock using Memento Tuxedo Black ink. The lines on the stamps are pretty wide, so I used my MISTI tool to allow an even impression of the stamps. The images were colored in using a variety of Chameleon markers. The images were cut out and set aside.


I wanted the sentiment of the card to really pop, so I stamped it using black ink. To form the background of the card, I used red ink and stamped a variety of images from the stamp set. Once the background was complete, I attached the cut out images. The pieces are attached to make it look like the steak is cooking on the grill.


Here is the list of Chameleon markers I used on today's card:
RD2, RD4, BR4, BR5, OR3, OR4, CG5, CG8

Please stop by the MarkerPOP blog for the entire supply list.

Thank you for stopping by today!

Jessi

Tuesday, July 4, 2017

Joy Clair - Blending with NeoColors Crayons

Hello, Joy Clair friends! I hope you are having a wonderful day! Today, I will be showing you my latest Bible Journaling page with the amazingly sweet Bee Kind stamp set. I love the images and sayings that are included in this set.

Have you used NeoColors? They are similar to Gelatos. I love to blend them with baby wipes, but today, I am trying something new. I am using water with them and turning them into watercolors.


To start the page, I stamp the honeycomb images along the side of the Bible Page. I drew in one line of the orange color along the bottom of each honeycomb.


Using a thin paint brush, I used water to spread the color around the image. To dry the page quicker, I used my heat gun and dried the page before I repeated the process with the yellow color.


I stamped the remaining images (beehive and bee) onto the page using black ink. The beehive with a light brown color. I wanted to highlight the verse, so I blended orange on the bottom and yellow on the top.


I loved the saying, but wanted to add on to it. I decided to break out my stickers and create a longer saying with variety of alpha and word stickers.

Are you interested in learning the latest news going on with Joy Clair? Join us on your favorite Social media sites to see our newest products and samples from the design team members.

Thank you for stopping by! Hope you have a wonderful day!


Supplies:
Joy Clair - Bee Kind
NeoColor Crayons
Memento Tuxedo Black Ink
Variety of Stickers

Saturday, July 1, 2017

Joy Clair - July Monthly Challenge

Happy July, Joy Clair friends! Today starts a new challenge over on the Joy Clair blog! This month, the design team is showcasing some of their favorite Joy Clair stamp set! The theme for this month is Anything Goes

Interested in joining the fun? Hop on over to the Joy Clair blog to find out how you can play along!

Today, I am playing with the Doodle Flower Background and Hello Sentiments stamp sets.


I love this background stamp! I decided to stamp/emboss the image in gold and cover only part of the panel. I left the bottom empty, so I could go back and emboss a sentiment. The sentiment is from the Hello Sentiment stamp set. I attached the embossed panel onto a robin's egg blue cardstock.

Such an easy card to create. You can even color in the image for a different look!

Thank you for stopping by!

Have a wonderful day!

Jessi