Showing posts with label American Crafts. Show all posts

Friday, February 24, 2017

Dreaming of the Next Time

Happy Friday, MarkerPOP friends! How has your week been going? I have managed to sneak in some crafting time and cannot wait to show you the creations I have completed. But first, let's move on to today's project.

Have you seen the cute My Favorite Things' Somebunny I Love stamp set? I fell in love with this stamp set as soon as I saw it. That sleeping bunny is super adorable!


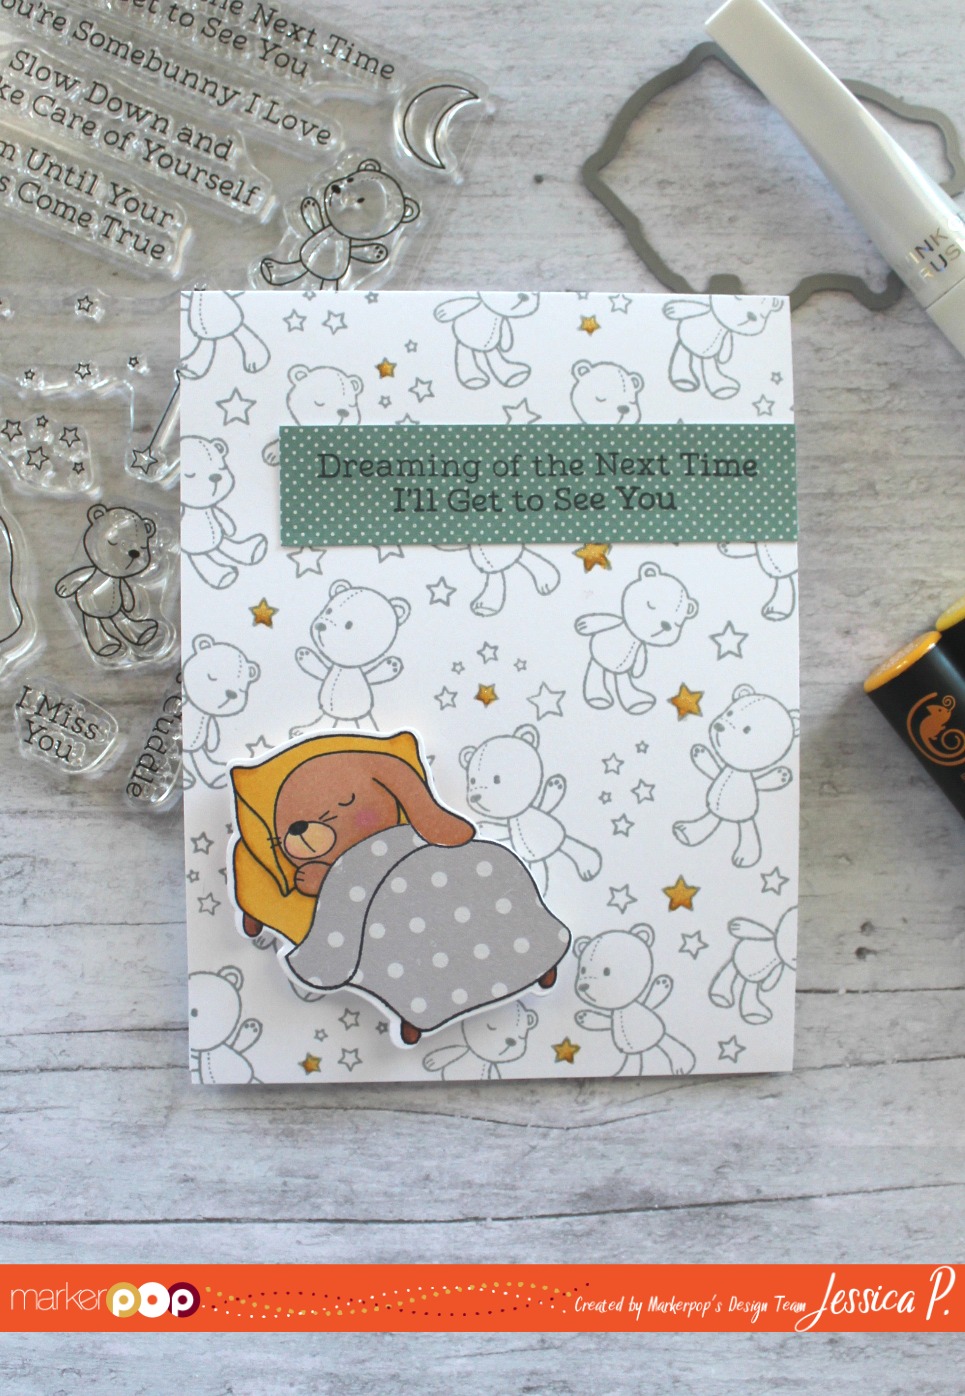
The image is cut a few times onto white cardstock. I colored in the image using Chameleon markers. I also stamped the image onto a printed paper. The blanket part of the image is cut out and attached onto the colored image. For the background of the card, I stamped the teddy bear images with gray ink. To fill in some of the empty spaces, I stamped stars. Some of the stars are colored in with yellow. Those stars are also covered with Wink of Stella-Clear to give the stars some sparkle. The sentiment is stamped onto a printed strip of paper and attached at the top of the card. The bunny image is attached to the card using foam dots.


Be sure to check out the rest of the My Favorite Things available in the MarkerPOP store!

Be sure to stop by the MarkerPOP blog to see the list of supplies used on today's project!


Thank you for stopping by and I hope you have a great day!

Thursday, December 22, 2016

Succulent Thank You

Hello, MarkerPOP friends! As we are getting closer to the holiday, my need for Thank You cards are growing. I try to get some done before the holidays, just so I do not have to make as many after.

Today I am using some cute Hero Arts stamps to create this card:


I started a few of the succulents images onto some watercolor cardstock. The images were stamped in a light color, so the outlines could be covered once they are colored in using Zig Clean Color Markers. The images are cut out and set aside. The bowl image is stamped and embossed in gold.


The pieces are arranged and attached to a fun print. The panel is added to a few different layers of prints. The sentiment is stamped and embossed in gold onto a piece of black cardstock.


Please stop by the MarkerPOP blog for a list of supplies used on today's card.

Thank you for stopping by today!


Saturday, May 7, 2016

Hello, Sunshine! - Sneak Peek for Pink & Main

Happy Saturday, Pink & Main friends! The new May Pink & Main will be available on May 10th! It is another adorable release!
 
Today, I am giving you a sneak peek of one of the new word stamp sets with coordinating dies,
Hello Friend.
 
 
 I am in love with the new rounded rectangle dies from Pink & Main. I used two of them to create the white frame. I placed a beautiful print under the frame. I paired two different prints with the new "Hello" word and shadow dies. I created a simple banner with a different print and stamped the rest of the sentiment.
 
Do you have problem matching prints as much s I do? My solution is to work with prints from the same collection. In fact, my favorite thing to use are 6x6 paper pads. I used the AC Shimelle True Stories paper pad for this card.
 
Do you love to create with Pink & Main stamps? We would love to see your projects! Please join the Pink & Main Creations Facebook Group and share your projects!
 
Do you love to participate in card challenges? Please check out the details HERE!
 
 I fell in love with the current sketch challenge over at Freshly Made Sketches and had to play along! Please stop by and check it out here!
 
 
Thanks for stopping by!
 

Saturday, February 13, 2016

Sweet Thoughts of You

Happy Saturday, Pink & Main friends! Sorry for the late post today. It has been a beautiful day here in Texas. After spending hours doing yard work and going to baseball practice, I lost track of my day! So I here I am posting this 'Sweet" card to end the day.

 Today, I am working with the Hello Sweet stamp set and coordinating dies
 
 I am in love with the new word stamps/dies from the January release. And there are more to come! On this card, I want to highlight the word die by using the matching shadow die. The sentiment is finished with the stamped word. I used a variety of printed papers to create the card. Once the sentiment is put together, I added a few wooden hearts to finish the card!
 
Thank you for stopping by today! Hope you have a wonderful weekend!

Jessi

Supplies:

Saturday, January 17, 2015

It's Your Time to Soar

Hello, Butterfly Reflections friends! It is Jessi from Kissin' Krafts and I am glad to be back to share with you a fun and fresh card. Reflection
 
Who else is ready to put winter behind them? I am ready to start crafting with fun and fresh prints!
 
Today's card, I am using a few supplies I bought from the Butterfly Reflections store lately!
 
 
I knew I wanted to use this fun sentiment from Avery Elle's Look Up stamp set.  My first thought was to use cloud print paper and maybe add a kite. As I was searching for the right paper, I came across the paper airplane print from AC Day Dreamer 6x6 paper pad.  The rest of the prints came from the same paper pad. (Who doesn't love paper pads? They make it so easy to coordinate papers!!!)
 
Once I attached the papers, I added a small white wooden clothespin to the card. However, it needed something else. I started messing with adding string to the project, but simply could not decide how to make it work. So after several attempts, I decided rely on my go-to add-on, enamel dots.
 
Thank you for stopping by today! Check out Butterfly Reflections for the latest product! Their selection is full of amazing possibilities!
 

Supplies:
American Crafts - Day Dreamer paper pad
Avery Elle  - Look Up stamp set
My Mind's Eye - Market Street Enamel Dots
 

Monday, December 29, 2014

Warm BRI Hugs and Kisses

Hello, Butterfly Reflections friends! It is Jessi from Kissin' Krafts and I am excited to share with you a fun and simple card!
 
When I saw this fun scene paper in the AC Jack Frost 6X6 pad, I wanted to create a scene with this adorable penguin from Winnie & Walter.
 
 
The scenery paper is used for the back layer of the card. The snowdrifts are created with white cardstock and snowdrift dies (similar to these in the BRI shop). The image is stamped/colored/amd cut out. A sentiment is stamped to follow the flow of the snowdrift. To finish the card, I attached a few punched out snowflakes.
 
Thank you for stopping by today! Don't forget to stop by the shop for the special sale going on now!
 
Supplies: 
American Crafts - Jack Frost
My Favorite Things - Snow Drifts


Friday, November 21, 2014

WCMD Honorable Mention at PCS Magazine! Please VOTE!

I am excited to share today's card with you! A few weeks ago, Paper Crafts & Scrapbooking Magazine announced their "Honorable Mentions" for the World Card Making Day Contest! I was super excited to see my name listed for the 'Love' catergory!
 
Starting today, PCS Magazine is holding a contest for the 'Honorable Mentions' from the WCMD contest. Stop over HERE to find out more about the contest and how to vote for my card! I appreciate all your help!!!
 
 
I hope you like it as much as I had fun making it!
 

This card uses the 'inlay' technique with a variety of dies. To start the card I used the polaroid die from Echo Park to cut out of the back layer of the card. Using the same die, I cut the shape out of another patterned paper and slide into the empty space on the blue backing. The frame showcased the white space on the card base, so I decided to leave that empty. The wooden accents (Studio Calico) are glued to the card base. The simple sentiment (Sweet Stamp Shop) is stamped onto the frame. (It is hard to see in the picture, but I colored and cover the heart with Glossy Accents). To finish the card, I stamped the card sentiment (Sweet Stamp Shop) onto a banner diecut and attached to the card on a foam dot. I wrapped some red Americna Crafts ribbon underneath the banner.
 
Please stop on over to the Paper Crafts & Scrapbooking blog to vote!
Hopefully for my card...hint, hint :)


Saturday, October 4, 2014

Happy World Card Making Day Part #1

Happy World Card Making Day 2014!

I am happy to be able to participate in the festivities today! I will have to keep my posts short and sweet, as I am sneaking in craft time between games, parties, etc!

The first card I completed today is to play along with the Butterfly Reflections, Ink challenge they have on their blog today! They actually have 2 going on now! Check them out HERE!

I am playing along with this sketch challenge:


Here is my take on the sketch:


Supplies:
Fancy Pants - Burlap & Bouquets paper pad and ready to go embellishments
My Mind's Eye - Enamel Dots
Waffle Flower - Bowtiful  stamp set
American Crafts - Ribbon
Memento Ink - Rich Cocoa

Wednesday, August 20, 2014

Pebbles Pockets saying Hello

It is my day on the Butterfly Reflections, Ink blog! I hope you stop by and check out my card, along with other design team creations!

This is the first project I have made using premade pockets. I received this Pebbles' pockets from the Butterfly Reflections, Ink shop and feel in love with the colors! The Front Porch collection has a beautiful combination of blues and pinks. I decided to focus on the blues in the collection.


If you are in need of making a quick card, these pockets are the solution! From cards to layouts, these pockets add such an elegant feature to any project!


Supplies used from the Butterfly Reflections, Ink shop:


Pebbles - Front Porch 6x6 paper pad

Thank you for stopping by today!

Tuesday, July 15, 2014

Hello, Butterfly!

Happy Tuesday everyone! It is Jessi from Kissin' Krafts! I cannot wait to share my latest Butterfly Reflections, Ink project with you!

One of the things I love about Butterfly Reflections, Ink, is their selection of 6x6 paper pads! I am truly addicted and there is always something I am craving in the store!

I am a fan of pretty much all the American Crafts companies (American Crafts, Pebbles, Studio Calico, Crate Papers, etc). I LOVE the fact that you can combine pieces from collections by the different companies. In the project below, the paper is Crate Paper and the woven ribbon and butterfly die are from Studio Calico! And look...they match PERFECTLY!!!


I love using wooden veneers on my projects! There are so many things you can do with them! I decided to color the front to match the papers. Once the markers dried, I stamped a simple sentiment with brown ink.

You can easily add texture to the simplest of cards bu using a variety of materials. The mixture of the ribbon, twine and wood add so much to this card!


Here is a quick look of the supplies used for this card:


Supplies from Butterfly Reflections, Ink:
**Kaisercraft stamps are currently sold out at the Butterfly Reflections, Ink store. However, there is a wide variety of stamps, including clear stamps are available! Check out the STAMP section of the store HERE

Also, using:
American Crafts - Brown twine ribbon
Spectrum Noir - Markers
Memento Ink - Rich Cocoa

Don't forget to check out the sale sections in the store 20% or 40%!

Have a wonderful day!


Thursday, February 6, 2014

Little Tangles - Celebrate Love Challenge!


It's the first Thursday of the month! Which means? It is time for a new Little Tangles Challenge! And being February, we are 'Celebrating Love'!
The current challenge is:
http://www.littletangles.blogspot.com/
I created this simple CAS card using the Neat and Tangled My Heart Sings stamp set, paired up with some Valentine's paper from American Crafts.
Interested in entering the challenge? Here are a few rules:
  • Create a NEW project based on the challenge theme. Your project must fit within the challenge theme in order to be eligible to win.
  • Submit your entry through the Inlinkz tool below. (If you have a blog, please link to the blog post with your challenge entry, not your entire blog!)
  • Link back to our challenge and display our challenge graphic in your blog post.
  • The use of Neat & Tangled stamps is not required, but it is strongly encouraged! If you don't own any Neat & Tangled stamps, check out the FREE digi stamps HERE
  • You may enter as many times as you'd like.
  • We'd love for you to be a follower of Little Tangles!
  •  You have until Sunday, Feb. 16th at 11:59 EST to enter.


Check out the Little Tangles blog to learn more! 

Cannot wait to see what you create!


Thursday, May 16, 2013

I'm Featured on Market Street Stamps!

First of all, I would like to start off with a big THANK YOU to Market Street Stamps for this opportunity to be the feature blogger on today's post! My favorite thing about Market Street Stamps is the high-quality, crisp images you get every time! The images are a perfect size for paper-piecing or coloring (which I chose to do on today's project)!


As soon as I got my hands on Market Street Stamps Gone Campin', I knew that I wanted to make some kind on treat packaging for Smores. A few thoughts came to mind and decided to give it a try using canvas treat bags. I started off with stamping the Gone Campin' images with black ink. The first attempt to coloring, I used markers, but they bled too much. For the next attempt, I brought out the color pencils! They worked great!!! 


Once again I want to thank Market Street Stamps for this amazing opportunity! It is always fun to create with their fun stamps! Stop on over to my blog, Kissin' Krafts, to see more crafty inspiration!


Supplies:
Market Street Stamps - Gone Campin'
Canvas Treat Bag
Colored Pencils
Palette Ink - Noir Black

Thursday, April 11, 2013

Happy Spring! from gel-a-tins

So are you experiencing any Springtime weather! Here is Texas, I have been able to open the windows and air the house. Nothing like getting fresh Spring air inside!
 
Today I am sharing a card I created using gel-a-tins Build your own Paisley and Easter Bunnies and rhinestones from The Robin's Nest:
 
 
The background is stamped with the Build Your Own Paisley and the the sentiment is stamped onto a patterned paper (also from The Robin's Nest). The flowers are made using rhinestones, sequins and twine.


Thank you for stopping by today! Please stop by the gel-a-tins Facebook page to find more gel-a-tins inspiration!


Supplies:
gel-a-tins - Build Your Own Paisley and Easter Bunnies
The Robin's Nest Rhinestones
Trendy Twine - Lemon Tart and Twisted Lime
Memento Rich Cocoa Ink


Friday, February 1, 2013

STOP in the name of gel-a-tins!

Hooray, it is February! Who else LOVES this month? Can you smell the LOVE in the air? It's Jessi from Kissin' Krafts and today I am excited to show this card that I made using the gel-a-tins STOP gelly jr. stamp!


I have always enjoyed the red, pink and aqua color combo and decided that this was the perfect card to make using those colors!

The STOP gelly jr stamp is stamped in pink and hand-cut. Using a variety of stickers and chipboard, I created the rest of the "sentiment". To add to the card, I used different embossing folders to add to the back layer and pink strip. The final piece to add was the simple twine,even though it is some what messed up in the picture ;)!

Thank you for stopping by today! Please share you gel-a-tins creations on our Facebook page, we would love to see what you come up with!

Supplies:
gel-a-tins - gelly jr. STOP sign
Recollection Kraft cardstock
Cuttlebug Embossing Folder - Seeing Spots
Paper Studio Embossing Folder - Woodgrain
Trendy Twine - Tickled with Teal
Lily Bee Design - Alpha Stickers
My Little Shoebox - Chipboard Letter
Misc. Chipboard heart


Playing along with CAS-ual Fridays - Love Letters

Saturday, July 21, 2012

Celebrate Summer

Well, summer is half over. That means we are getting closer and closer to school starting up again! (Is it bad that I am too excited for that fact?)  Any who!

Today I am sharing a quick card I created using American Crafts Margarita Collection.

Here is the card creation:

To make part of the city "pop" I used foam dots on the bottom row of building.  The sun is cut out of one of the papers from the collection. The cloud is hand-cut.  The stamp is from a Dear Lizzy Stamp Set.

I know that this is a quick post! Just wanted to add one during this busy weekend! Hope everyone is enjoying the summer and are able to soak up some sunshine!

Thanks for stopping by!
Jessi

Playing along with the following challenges:
Stamp N Plus - Anything Goes

Monday, January 30, 2012

Reveal Day at Cardabilities!

Welcome to the latest Cardabilities Reveal Day!  There is an awesome sketch that I am sure will inspire everyone!  Here is the sketch:
And here is my take:
Supplies:
Recollection Kraft Cardstock
American Craft - Garden Cafe Collections
DCWV Textured Cardstock
Paper Studio Letter Stickers
Studio G - Friend Stamp
Martha Stewart Doily Border Punch
EK Success Scallop Border Punch
Burlap

I have been waiting for  awhile to add burlap to a card. When I came across the Garden Cafe collection from American Crafts, I knew it was a perfect match! I decided to hand cut some of the floral design and add it to the burlap to highlight the flowers. 

Please make sure to stop by and see the amazing cards that the Cardabilities design team has created with this amazing sketch!  Cannot wait to see what you come up with!

Also entered into the following challenges:
The Cupcake Challenge - Recycle (burlap came from burlap sack)
Crazy 4 Challenges - Layers


Saturday, August 20, 2011

Summer is almost over...yippee!

Been a busy week!  School starts on Monday...is it wrong that I am jumping in my boots with excitement!  The boys have been non-stop fighting ALL summer...I am looking forward to the "quiet" time during the day!  Brayden starts Kndergarten this year, boy is time going fast!

Here are a couple of layouts that I was able to work on recently.  I included my own handwritten journaling and not happy with the outcome.  I think I am done with the handwritten!
AC - Confetti (Paper and embellishment)  and Thickers
AC Hello Sunshine (papers) and Thickers

Monday, August 15, 2011

Our Home

I love doing altered projects!  They mostly consist of unfinished wood projects, however, I am hoping to break into the world of altered albums!  I used all American Crafts papers and embellishments for this project. (Peachy Keen Collection).  The wooden house came from Michael's.

Thanks for stopping by!  Have a great day!

Thursday, July 28, 2011

Happy 75th Birthday!

Last week my grandmother turned 75!  I can place all the blame onto her for getting me into the papercrafting world!  She has been making cards for years! (In fact, I have a box..or two... of all the cards she has made for myself and kiddos.)  I used American Crafts papers for the card.
Also, from American Crafts, I used Thickers. The stamp is from Studio G. 

One of the trends that I have been using is fussy-cutting.  Using one of the flowers in the patterned, I fussy-cut the layered flower next to the bracket (Spellbinders die-cut).

Hope you had a great birthday Granny!


Wednesday, July 27, 2011

Baby you're the one...

So I have been cranking out projects this week!  I need to send a special Thank You to my wonderful husband, for giving the time I was craving locked up in my craft room!
I LOVE Lily Bee Designs!  The vintage feel of the papers, the colors, what more can you ask for?  I created this following layout using "This & That" papers.


All the papers are from Lily Bee.  Along with the red alpha stickers and the stamp.  I also used AC Thickers and Cosmo Cricket small alphas. To add a little 3D to the page, I made the flower at the top of the page using a Fiskar circle punch and Basic Grey button.

I also use decorative scissors to cut the edge of the photo mat. I simply folded the edge over and inked the scallops, so they would stand out more.

Have a great one!