Showing posts with label watercolor. Show all posts

Thursday, October 5, 2017

Happy Thanksgiving

Hello, MarkerPOP friends! Can you believe that it is October already? Before we know it, it will be Thanksgiving! Do you have the Thanksgiving dinner at your house or do you go visit somewhere else? I usually go to my in-laws, but I always bring along a few side dishes.

Today I am working with the Hero Arts Thanksgiving Table and ZIG Clean Color Markers:


This stamp set includes several little images. I decided to use them to create a background print. I used the MISTI to help with the placement of the stamps. To fill in some of the empty space, I stamped green leaves. I used a variety of ZIGs to color in the images. The sentiment is stamped on a strip of cardstock and attached to the card.


Have you seen the latest contest? Stop by and learn about your chance to win!


Thank you for stopping by today!


Wednesday, October 4, 2017

Joy Clair's Embossing and Watercolor

Hello, Joy Clair friends! Can you believe that it is October? This year has flown by fast! Now that with the holiday season around the corner, I am sure the rest of the year will go by faster! 

Today I will be showing you two projects, one using a Everyday stamp set and one using a Color by Faith stamp set. 

My first project for today is one of my latest Bible Journaling pages. I am using Color by Faith's Noah's Ark stamp set:


I wanted to keep this page simple. So I stamped the ark in brown. The clouds were stamped in a gray ink. The animals are stamped in a orange/brown color. Once these inks dried, I used a variety of distress inks and used them as watercolors and filled in the rest of the column. To add the look of the rain starting, I used the salt/pepper dots from the Salt and the Light stamp set. To finish the page, I stamped the phase stamps with black ink.

Next up, is a card using the Rose Sentiments stamp set:


I love working with kraft cardstock. I really love how the color red POPS off the kraft color. To start my card, I stamped the rose frame with red ink and cut the frame out. For the card, I embossed swirls on the front of the card. To make the swirls stand out, I lightly swiped a white ink pad across the embossed swirls. I wanted the sentiment to stand out, so I stamped it ink brown ink. The rose frame is attached to the card base using foam dots.

Interested in learn the latest news with Joy Clair Stamps? We would love for you to follow our Social Media pages!


Thank you for stopping by!
Jessi

Saturday, September 30, 2017

Sending Birthday Wishes

Hello, MarkerPOP friends! It is football season! I am not sure about where you live, but on the weekends here, the skies are full of planes with advertisement banners.

So with that in mind, here is my card using the Waffle Flower's Across the Miles and ZIG Clean Color markers:


The airplane and banner are stamped in black ink. Once the ink dried, I used ZIG Clean Color markers to color in the scene. I added blue sky around the images. To add some design to the top of the panel,  I stamped a hot air balloon and added some die cuts of clouds.  The panel is cut out using a fancy rectangle die and attached to kraft cardstock.


The following ZIGs were used on today's card:
010, 022, 030, 047


Thank you for stopping by! Have a wonderful day!

Jessi

Thursday, September 28, 2017

Hey, Sugar!

Hello, MarkerPOP friends! As Halloween/Fall décor is starting to fill the stores, I have noticed a growing trend with Sugar Skulls. The Day of the Dead décor is seen everywhere! And I don't know about you, but I love the bright, bold colors the décor includes. So when I saw the Sugar Skulls stamp set from Hero Arts, I knew that I needed to get my hands on it!!

So today, I am sharing my first card (I have so many ideas for this set, that I know there will be more!), using the Hero Arts Sugar Skulls stamp set and ZIG Clean Color markers:


The first step I took making this card, was stamping the skulls down the edge of watercolor cardstock. I used the masking technique while stamping the skulls. I used a dark gray ZIG around edges of the skulls and spread the color using water. I really enjoyed how this made the white of the cardstock pop where the skulls were stamped.


Now it was time to color in the faces. The stamp set includes a few different layered stamps with designs. I used the layered stamps on the faces and colored in using bright and bold ZIG colors. (I did not use water on these colors.) I wanted to add a few splashes of paint on the card, so I placed a strip of paper to cover the skulls and splattered a few spots around the card. To finish the card, the sentiment is stamped in black ink.

The following ZIGs were used on today's card:
010, 022, 027, 031, 041, 052, 070, 080, 095


Thank you for stopping by! Have a wonderful day!

Jessi


Thursday, September 21, 2017

Eat, Drink, and Be Scary

Hello, MarkerPOP friends! Halloween is next month. Are your kids getting excited? I have one that has his costume all planned out and two that will wait to the last minute! 

Have you heard of Elizabeth Craft Designs stamp company? They are one of the newest brands now available in the MarkerPOP store.

Today, I am using their Halloween stamp set on my card:


I stamped a few of the designs onto watercolor cardstock and colored in using ZIG Clean Color markers. Once the images were dry, I used the coordinating dies to cut out the image. The next step is to create an A2 card out of watercolor cardstock. On the front of the card, I stamped the gravestone image. I used the ZIGs again to color in the image. I extended the grass on both sides of the image. The sentiment is stamped below the grass. I wanted to include a moon and some stars. The moon is colored in by hand. The stars are from a cluster stamp from the My Favorite Things Somebunny I Love stamp set. The die cut images are attached using foam tape.


I used the following ZIG Clean Color markers on today's project:
022, 024, 070, 052, 046, 047, 035, 094, 010, 095


Thank you for stopping by! Have a wonderful day!
Jessi

Thursday, August 24, 2017

Sending Birthday Wishes

Hello, MarkerPOP friends!!! We are coming up on the end of summer. I am ready to start seeing some fall flowers popping up in our local gardens. This Texas summer heat has done a number on the flowers!!! What is your favorite fall flower? Mine probably would be sunflowers.

Today, I am showcasing the WPlus9 Design's Modern Peonies stamp set and ZIG Clean Color markers:


The floral image is stamped and embossed with clear embossing powder. I used only a few ZIG colors to color in the image. In fact, only one shade of each color was used. Find out below the exact colors used. To highlight the flower, I used a very light watercolor blue background. 


Once the watercolor was completely dry, I used a fancy scalloped frame die to cut out the panel. The panel is attached to kraft cardstock. To finish the card, I stamped the sentiment using brown ink onto the card. The final touch was to add three clear droplets to the card.

The following ZIG Clean Color Markers were used on today's card:
024, 026, 036, 041, 052


Thank you for stopping by! Have a wonderful day!

Jessi

Friday, August 18, 2017

Joy Clair's Flamingo Bible Page

Hello, Joy Clair friends!!! Today I am super excited to share one of the latest Bible pages. I could not wait to get to work with the Color by Faith's Be a Flamingo stamp set! I did have a hard time deciding which one to work with first...flamingos or the pineapple. Flamingos it was!

Here is my page using the Color by Faith's Be a Flamingo set:


To start this page, I stamped the flamingos at the bottom of the page. I did use the masking technique on the two flamingos on the right side of the page. In doing this technique, it gives the illusion that one flamingo is standing behind another one. 

I used Prima Watercolors to color in that scene. I used a pink for the flamingos. A tan for the beach. A dark blue for the ocean water and a lighter blue for the sky.  Once the watercolor was dry, I stamped a variety of the word stamps from the Flamingo stamp set.

Interested in learning more about Joy Clair or keep updated on their latest news? Join us on our different social media accounts.

Thank you for stopping by!

Jessi

No Line It's Your Birthday

Happy Friday, MarkerPOP friends! Who is ready for the weekend? I know that I am! It is the last weekend before the kiddos go back to school! And this mama is ready to get back to a regular schedule!!!

Today, I am sharing a birthday card I created using the No-Line Coloring technique:


To start this card, I stamped the large birthday sentiment from the Waffle Flower's Eat Cake stamp set. The stamp is done with a light colored ink onto watercolor cardstock.  I really wanted the sentiment to pop, so I used a variety of neon Zig Clean Color markers to color in the image. I completed the image with the rainbow effect.


This is simply technique to do. All you need to do is take you time and follow the lines!!!

The following ZIG Clean Colors were used on today's card:
001, 002, 003, 004


Thank you for stopping by!

Jessi

Thursday, June 29, 2017

This Place is Not My Home

Hello, Joy Clair friends! It is Jessi from the Joy Clair Design Team. How many of you love to camp in the summer? I think it would be fun...until I think about sleeping in the hot, sticky night and that changes my mind. Now, if I had access to a camper, that might change my mind...might.

Today I am using a number of different Joy Clair sets to create this Bible journaling page below:


To start this page, I stamped the camper image from the Happy Camper stamp set. I stamped an additional camper onto paper and use it for the masking around the camper. I wanted to make it look like the camper was moving, so I added exhaust behind the camper by stamping the bubbles from the Anchor of Hope stamp set.

The next step is to add the trees to the scene. I stamped a couple onto paper from masking process. The trees are from the Happy Camper stamp set. To add the mountain background, I placed the masking trees in place and stamped the mountains. The mountains and clouds are from the Wild and Free stamp set.

The entire page is colored in using Zig Clean Color Watercolor markers. I wanted to add stars to the sky. I wanted to try something instead of white paint splatters. I used NUVO White enamel drops to create the starry sky. Once the stars were dry, I added the stickers for the wording on the page.


Are you interested in learning the latest news going on with Joy Clair? Join us on your favorite Social media sites to see our newest products and samples from the design team members.

Thank you for stopping by! Hope you have a wonderful day!


Supplies:
Memento Tuxedo Black Ink
ZIG Clean Color Markers
NUVO White Drops
Variety of Stickers

Tuesday, April 25, 2017

Watercolor Background with Altenew

Hello, MarkerPOP friends! I love to work with bright colors, but I am switching it up today! Throughout the month, the design team is showcasing different watercolor products and techniques on the MarkerPOP blog!

Today, I am creating a watercolor background print. I am using the Altenew's You Make Me Happy stamp set (currently out of stock, but check out the other Altenew floral stamp sets HERE) and ZIG Clean Color markers.


To start this card, I stamped the images with white ink and embossing powder. The embossing powder creates the raised edges to help keep the paint in the right place. I used soft colors to fill in the image. The stems are colored in using ZIG Clean Color - May Green (047 ). The center of the flower is colored in with Light Carmine (021). Light Pink (026) was used on the inside of the flower petals. To fill in the background, Light Blue (036) was used.  To finish the card, the simple sentiment was stamped with Memento Tuxedo Black ink.


Did you see the latest MarkerPOP challenge? It is all about watercolor florals! Stop over HERE to join in the fun!


Don't forget to join in for your chance to win some watercolor supplies! Find out how by stopping HERE!


Thank you for stopping by! Have a wonderful day!

Jessi


Friday, April 21, 2017

Happy Day + ZIGs

Hello, MarkerPOP friends! Less than one year ago, I was scared of watercolors! I was scared of them! I threw away many projects, just because I was not happy with my watercolor skills. In fact, one of my goals last year was to work on my watercolor techniques! But when I got my hands on Zig Clean Color Markers, I fell in love!

Today, I paired up my Zig markers with the super cute Waffle Flower's Happy Day stamp set:

I struggle when it comes to shadows. The Zig markers help out so much with that! I grabbed three shades of brown to color in the bear image.

Start with the lightest shade of brown and color the outline of the image. Using water and a paintbrush, spread the color from the outside towards the inside of the image.


Do the same with the middle shade of brown.


Now add the darkest shade of brown around the outer edges and spread the color towards the inside.


Now it is time to color in the rest of the image. Please stop by the MarkerPOP blog to see the list of markers used for today's card. To finish of this card, the sentiment is stamped and embossed in white onto a black strip of cardstock.


Don't forget to enter your chance to win some watercolor supplies! Stop by HERE to find out the details!


Have a wonderful day!

Jessi

Friday, April 14, 2017

Partying with MarkerPOP

Hello, MarkerPOP friends! Are you enjoying all the watercolor tips and techniques the design team has been sharing? I am not all that comfortable with watercolors, but lately I have been stepping out of my comfort zone and using them more!

Have you ever tried to do paint splatters? I have to admit, it took me several attempts before I was happy with my splatters!

Today, I am working with Lawn Fawn's Year Seven stamp set and Prima Confections - Tropical watercolors.


I stamped the piñata image onto watercolor cardstock with Memento Black ink. Once the ink was completely dried, I painted the image using Prima Confections watercolor. The image is then cut out and set aside.


Time to work on the background of the card. I randomly stamped the candies and confetti stamps over the panel. Now it is time to do the paint splatters! First, I choose a magenta color paint and watered the color down. Using a paint brush, I soaked up the watered down paint. Over the cardstock panel, I lightly tapped the end of the paint brush, tilting the brush in the direction I wanted the splatters to go. I repeated this process with each color of paint.

Once the paint dried, it is time to piece the card together. A piece of white twine is attached to the piñata image. A foam dot is attached to the back of the piñata and attached to the background panel. The twine is wrapped around the top, to make the piñata look like it is hanging for the top. The sentiment is stamped and embossed onto black cardstock. The sentiment is then cut into strips and attached to the card!


Stop by the MarkerPOP blog to see the list of supplies used on today's card!

Thank you for stopping by today! Don't forget to stop by throughout the month for more watercolor tips!

Have a great day!

Jessi

Wednesday, April 12, 2017

Joy Clair's Flawless Bible Journaling

Hello, Joy Clair friends! I am super excited to be working with the new Joy Clair release! There are a total of 8 stamps being released. Four sets for the Color by Faith line and four everyday stamp sets. For the next few months, the design team will be presenting a variety of projects with the hopes of filling you with inspiration! During the month of April, the team will be using the masking technique on our projects.

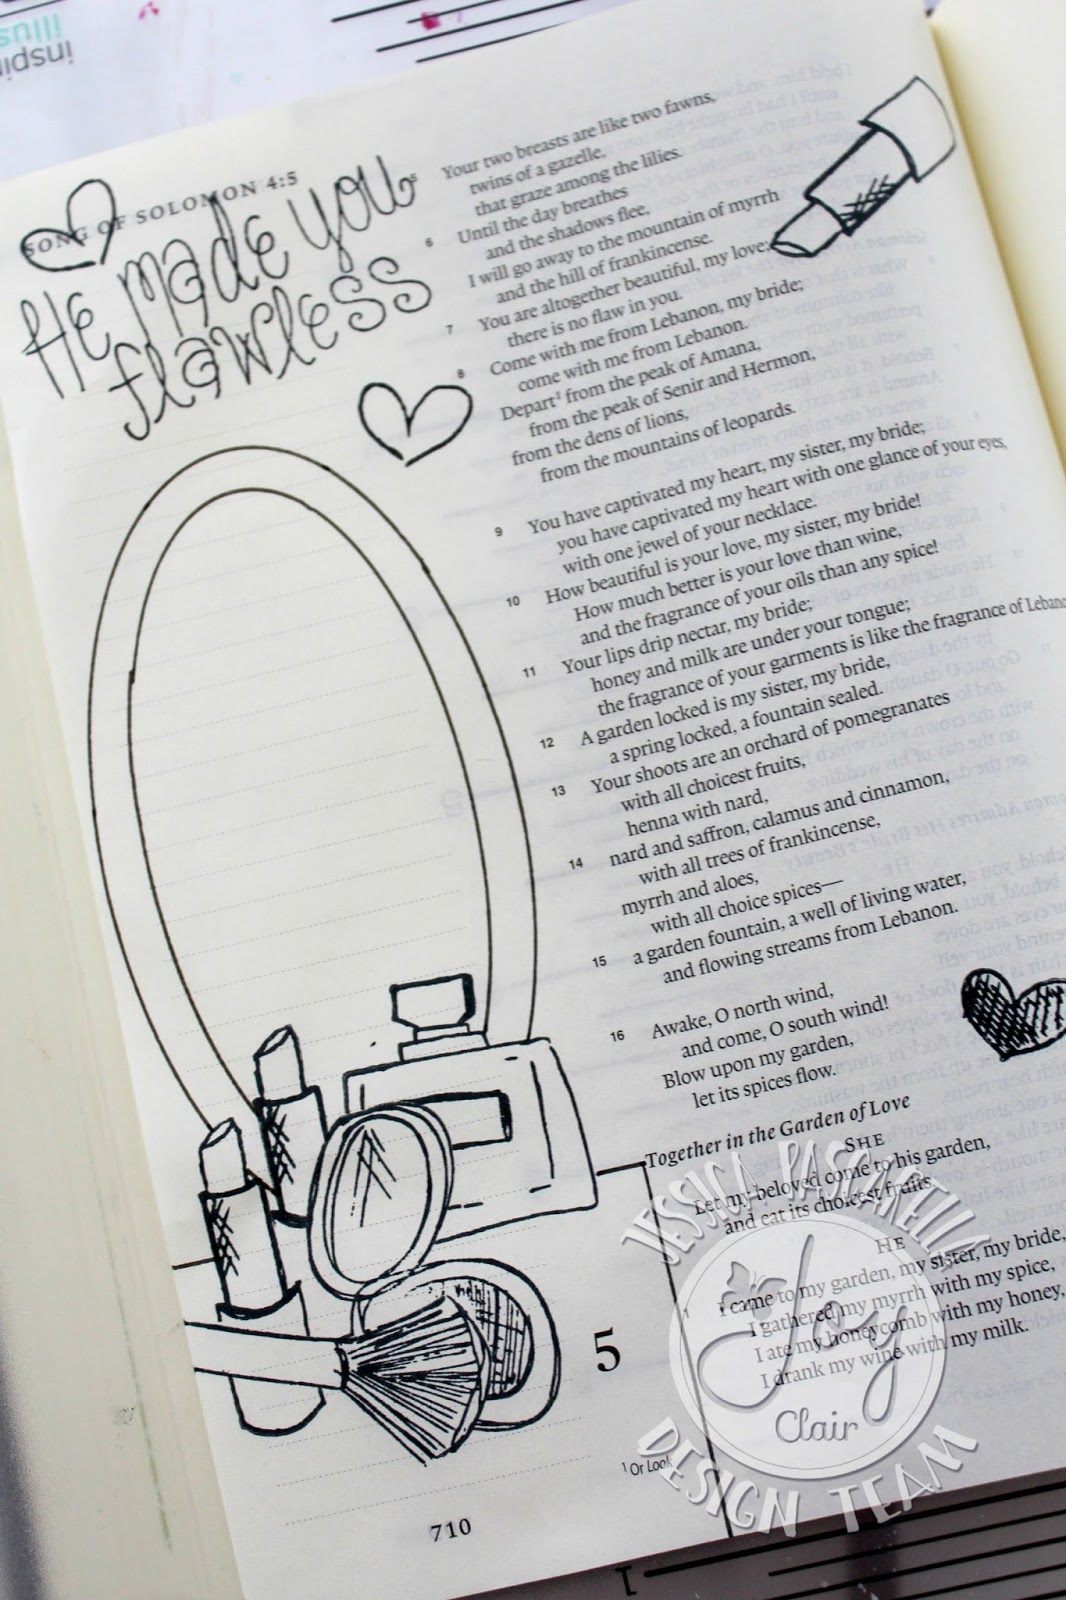
Today, I am showcasing the super adorable, Color by Faith's Flawless stamp set. 


To start this project, I stamped the images I needed onto stamping mask paper. These images will cover the stamped images to make the scene look like there is some depth.


Now it is time to start the stamping. You start with the stamped image that will be at the front of the and place the image onto the Bible page. Then you cover the image before you stamp the next one. You continue to cover the images in the places you do not the stamped image to show. When you finish the stamping, remove the masking paper.


I wanted the scene to appear like it was on a tabletop. I used an oval die to trace the inside and outside of the oval to form a mirror. Lines were drawn with a pen to create the table top.


Here is the complete scene before I started to paint it. I did forget to take a picture, but I used the Wood Background stamp and stamped it on the tabletop. I used a mixture of regular watercolors as well as metallic watercolors.


When the scene was completed, I stamped the sentiment/phrases in black ink. I also highlighted the Bible verse with the same watercolor shade I used on the lipstick image next to it.

Are you interested in learning the latest news going on with Joy Clair? Join us on your favorite Social media sites to see our newest products and samples from the design team members.
 YouTube 

Thank you for stopping by today!


Supplies:
Joy Clair - Flawless and Wood Backgroud
Memento Ink - Tuxedo Black Ink
Stamping Masking Paper
Watercolors


Friday, April 7, 2017

Watercoloring Your Diecuts

Hello, MarkerPOP friends! This month the design team is going to be sharing a few of our favorite watercoloring supplies. I recently received my first Prima Confections Watercolor set. I fell in love with them! The watercolor is probably the thickest I have ever worked with!

Today, I am pairing up the watercolors with My Favorite Things dies. I love using watercolors to color paper when I cannot find the right shades of cardstock to work with!


 To start this card, I painted a variety of swatches using the different colors in the Tropical Confections set. I spaced the swatches out to allow room to fit the various dies.


Once the individual dies are cut, it is time to piece the card together! The Birdhouses die set includes the house, roof and the pole to assemble the house. There is also a couple little bird dies to add a little cute touch to your project.

The background panel is also covered with watercolor as well. I included a layer of grass diecut to add a little dimension to the card,

I wasn't sure what I what kind of sentiment I wanted to use on this card. So I decided to leave it blank. I will be able to stamp a sentiment on the inside of the card that will fit whatever the occasion might be.


Thank you for stopping by today! Stop by the MarkerPOP blog for the list of supplies used on this card!

Have a wonderful day!

Jessi

Wednesday, April 5, 2017

MISTI + Joy Clair Stamps Promotion

Hello, friends! Today is an exciting day on my blog! The design team from Joy Clair Stamps has teamed up with the design team from My Sweet Petunia! We are doing a cross promotion to show how awesome the MISTI tool is with Joy Clair clear stamps! If you are hopping along, you should be arriving from the amazing, Giovana's blog! If you just happened upon my blog and would like to start from the beginning, you can find the list of blog stops at the bottom of my post.


Today, I am working with one of Joy Clair's newest stamp sets, ____________ and the Mini MISTI!


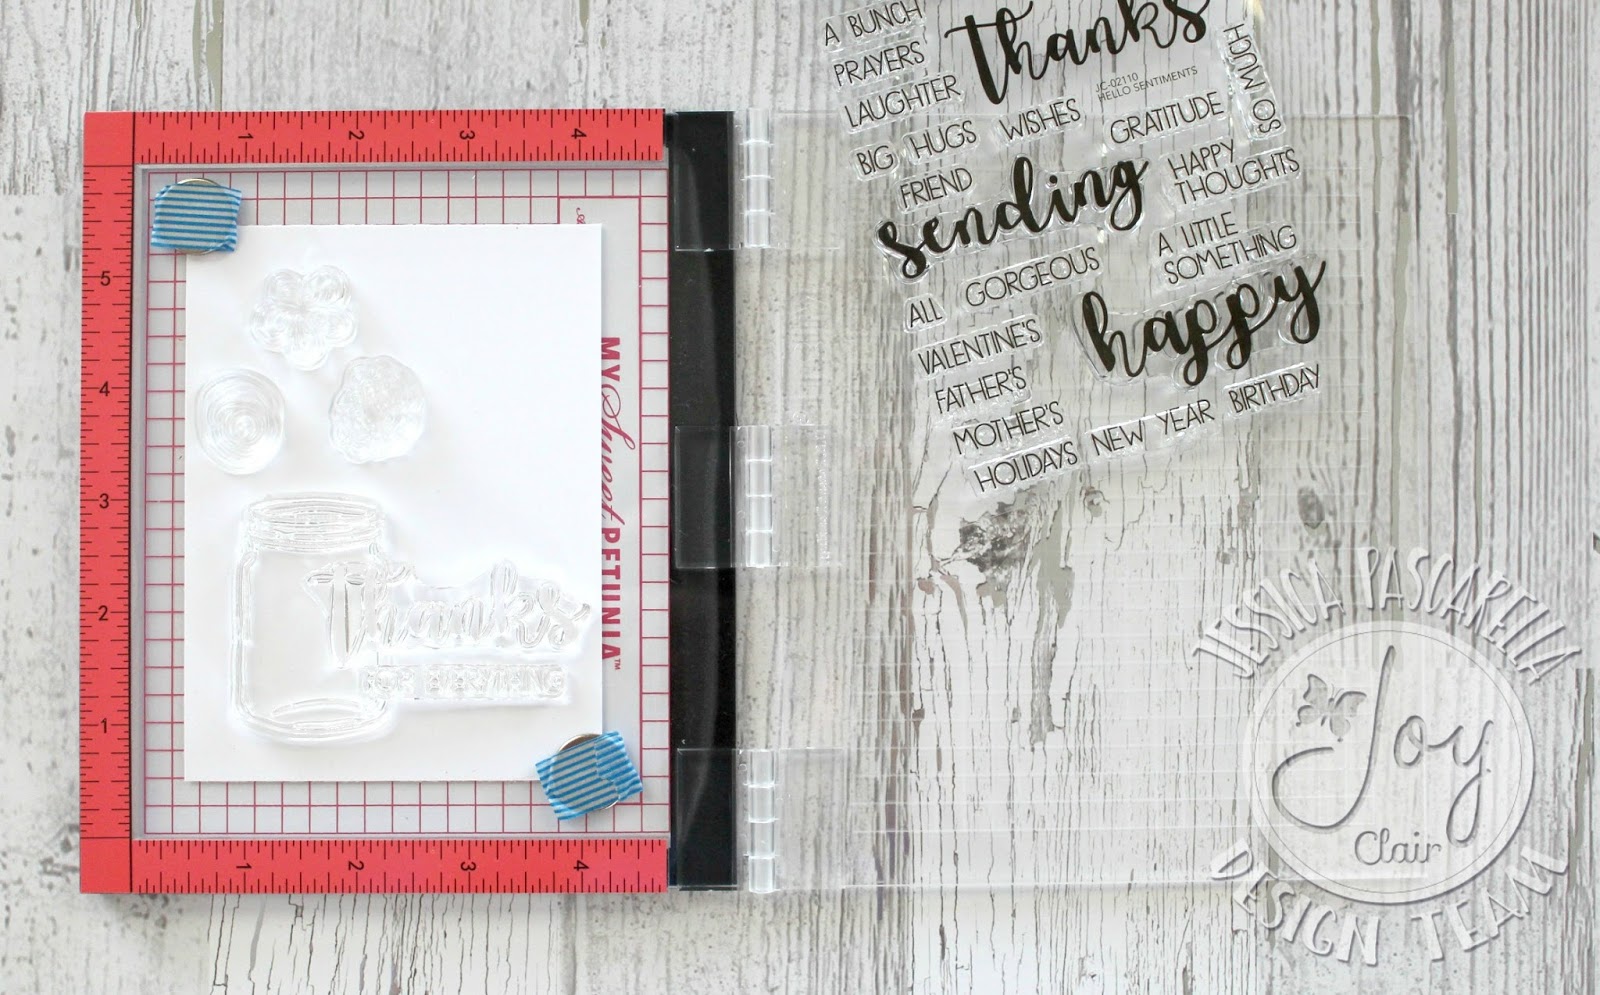
One thing I like about the MISTI tool, is that it makes it easy to work on the layout of the card. You can visualize how the stamps will look and make any changes that are needed to be made. Below, you can see that I worked with the placement of the stamps.


Now it is time to stamp the images from the Doodle Flowers stamp set.  I am planning on using different colors, so I stamp one image at a time. For now, I am only stamping the images, I plan to come back later and color in the images with the same inks.


If you have been stopping by the Joy Clair blog this month, you see that the design team is working with the 'Masking' technique. I decided to include it on this card as well. I wanted the jar to look like it is sitting on a tabletop. To achieve this, I stamped the jar image onto an extra piece of cardstock and cut the image out. The cutout is placed onto the stamped image and washi tape is place across the card. The Wood Background stamp is inked with brown ink and pressed on the card. Once you remove the tape, you can see that the wood grain image is not stamped on top of the jar.


Another thing I like about the MISTI, is that when an image does not stamp completely, you can re-ink the stamp and stamp in the exact same place, for a solid image. Below, you can see that the images from the Hello Sentiment set did not stamp correctly, so I repeated the stamping process.


To finish the card, I placed the card panel on top of a fun print and placed it onto a A2 card base.

Let's talk about prizes!!! My Sweet Petunia is giving away one MISTI and Joy Clair is giving away $25 Joy Clair gift card to two (2) lucky winners! All you have to do to increase your chances to win, is to leave a comment on each participating blog! All comments must be completed by April 9th at Midnight. The Joy Clair winners will be announce on the Joy Clair blog, Wednesday April 12.


Thank you for stopping by today! To continue along with the MISTI & Joy Clair hop, your next stop will be to the talented Stephanie's blog.

Here is the complete list of hop stops:


Supplies used on today's project:
My Sweet Petunia - Mini MISTI
Joy Clair Stamps - Doodle Flowers, Hello Sentiments and Wood Background stamp sets
My Favorite Things Inks - Cotton Candy, Poppy, Ripe Raspberry and Sour Apple
Ranger Distressed Ink - Tumbled Glass and Brushed Corduroy
Memento Tuxedo Black Ink
Echo Park - Let's Be Mermaids 6x6 paper pad