Showing posts with label masking. Show all posts

Wednesday, April 12, 2017

Joy Clair's Flawless Bible Journaling

Hello, Joy Clair friends! I am super excited to be working with the new Joy Clair release! There are a total of 8 stamps being released. Four sets for the Color by Faith line and four everyday stamp sets. For the next few months, the design team will be presenting a variety of projects with the hopes of filling you with inspiration! During the month of April, the team will be using the masking technique on our projects.

Today, I am showcasing the super adorable, Color by Faith's Flawless stamp set. 


To start this project, I stamped the images I needed onto stamping mask paper. These images will cover the stamped images to make the scene look like there is some depth.


Now it is time to start the stamping. You start with the stamped image that will be at the front of the and place the image onto the Bible page. Then you cover the image before you stamp the next one. You continue to cover the images in the places you do not the stamped image to show. When you finish the stamping, remove the masking paper.


I wanted the scene to appear like it was on a tabletop. I used an oval die to trace the inside and outside of the oval to form a mirror. Lines were drawn with a pen to create the table top.


Here is the complete scene before I started to paint it. I did forget to take a picture, but I used the Wood Background stamp and stamped it on the tabletop. I used a mixture of regular watercolors as well as metallic watercolors.
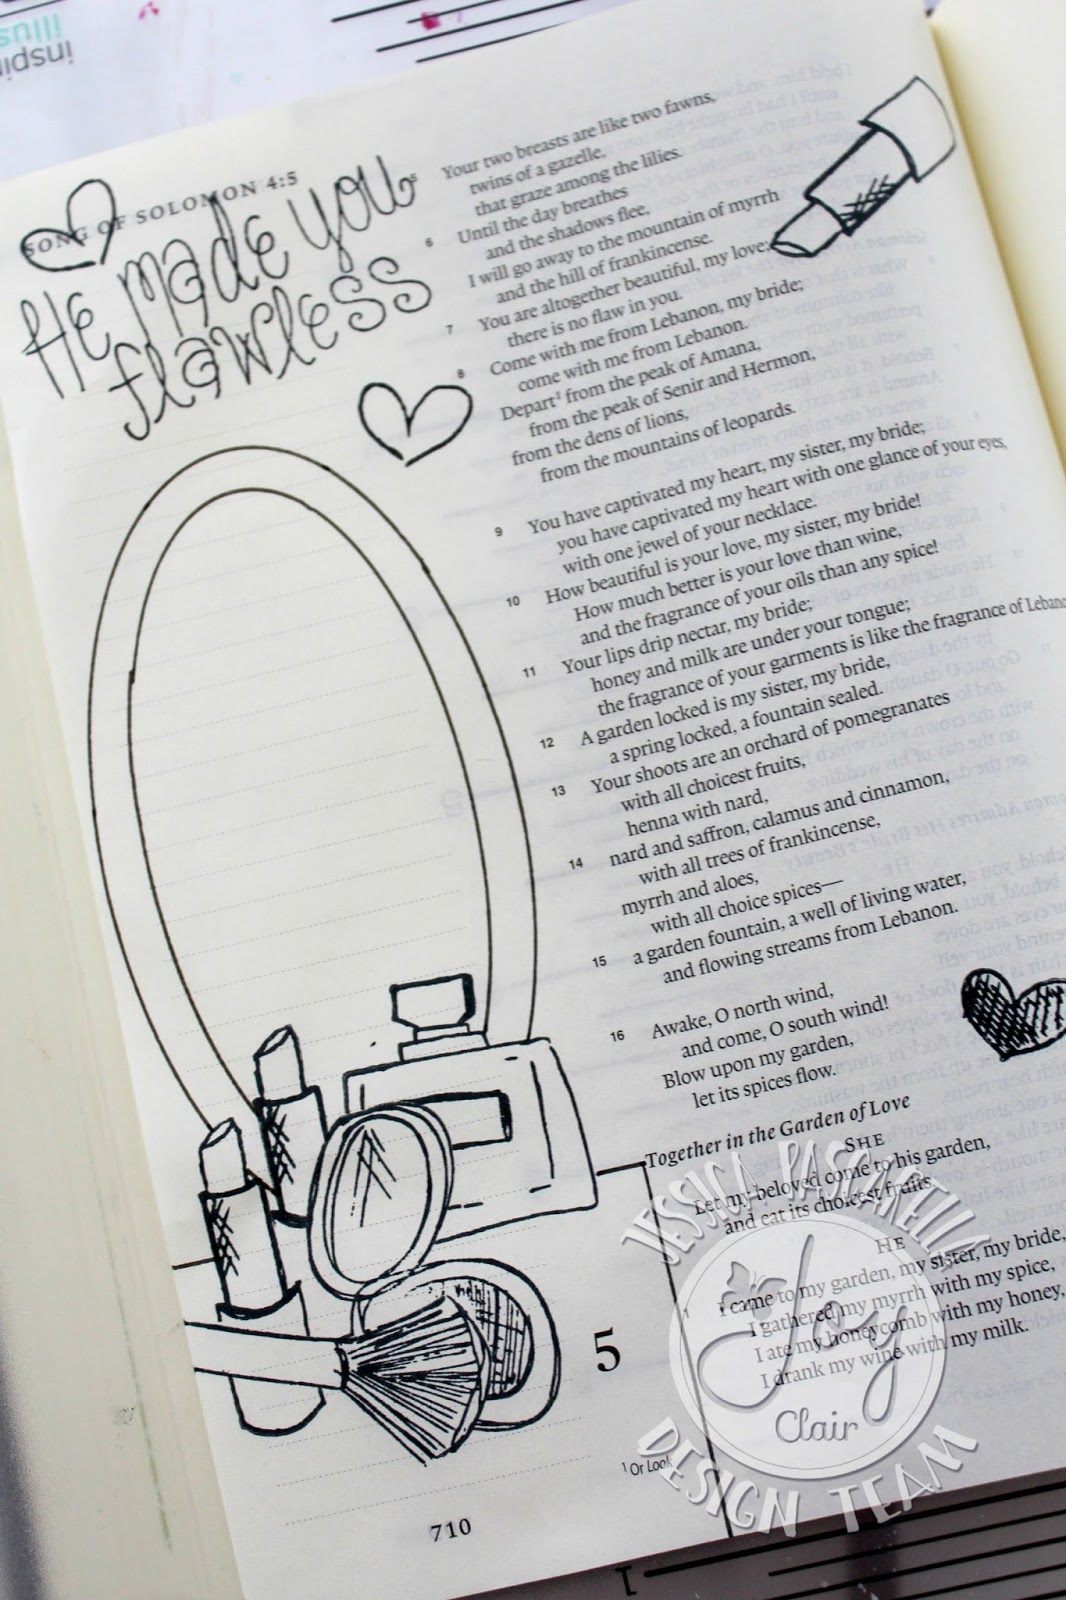

When the scene was completed, I stamped the sentiment/phrases in black ink. I also highlighted the Bible verse with the same watercolor shade I used on the lipstick image next to it.

Are you interested in learning the latest news going on with Joy Clair? Join us on your favorite Social media sites to see our newest products and samples from the design team members.
 YouTube 

Thank you for stopping by today!


Supplies:
Joy Clair - Flawless and Wood Backgroud
Memento Ink - Tuxedo Black Ink
Stamping Masking Paper
Watercolors


Wednesday, April 5, 2017

MISTI + Joy Clair Stamps Promotion

Hello, friends! Today is an exciting day on my blog! The design team from Joy Clair Stamps has teamed up with the design team from My Sweet Petunia! We are doing a cross promotion to show how awesome the MISTI tool is with Joy Clair clear stamps! If you are hopping along, you should be arriving from the amazing, Giovana's blog! If you just happened upon my blog and would like to start from the beginning, you can find the list of blog stops at the bottom of my post.


Today, I am working with one of Joy Clair's newest stamp sets, ____________ and the Mini MISTI!


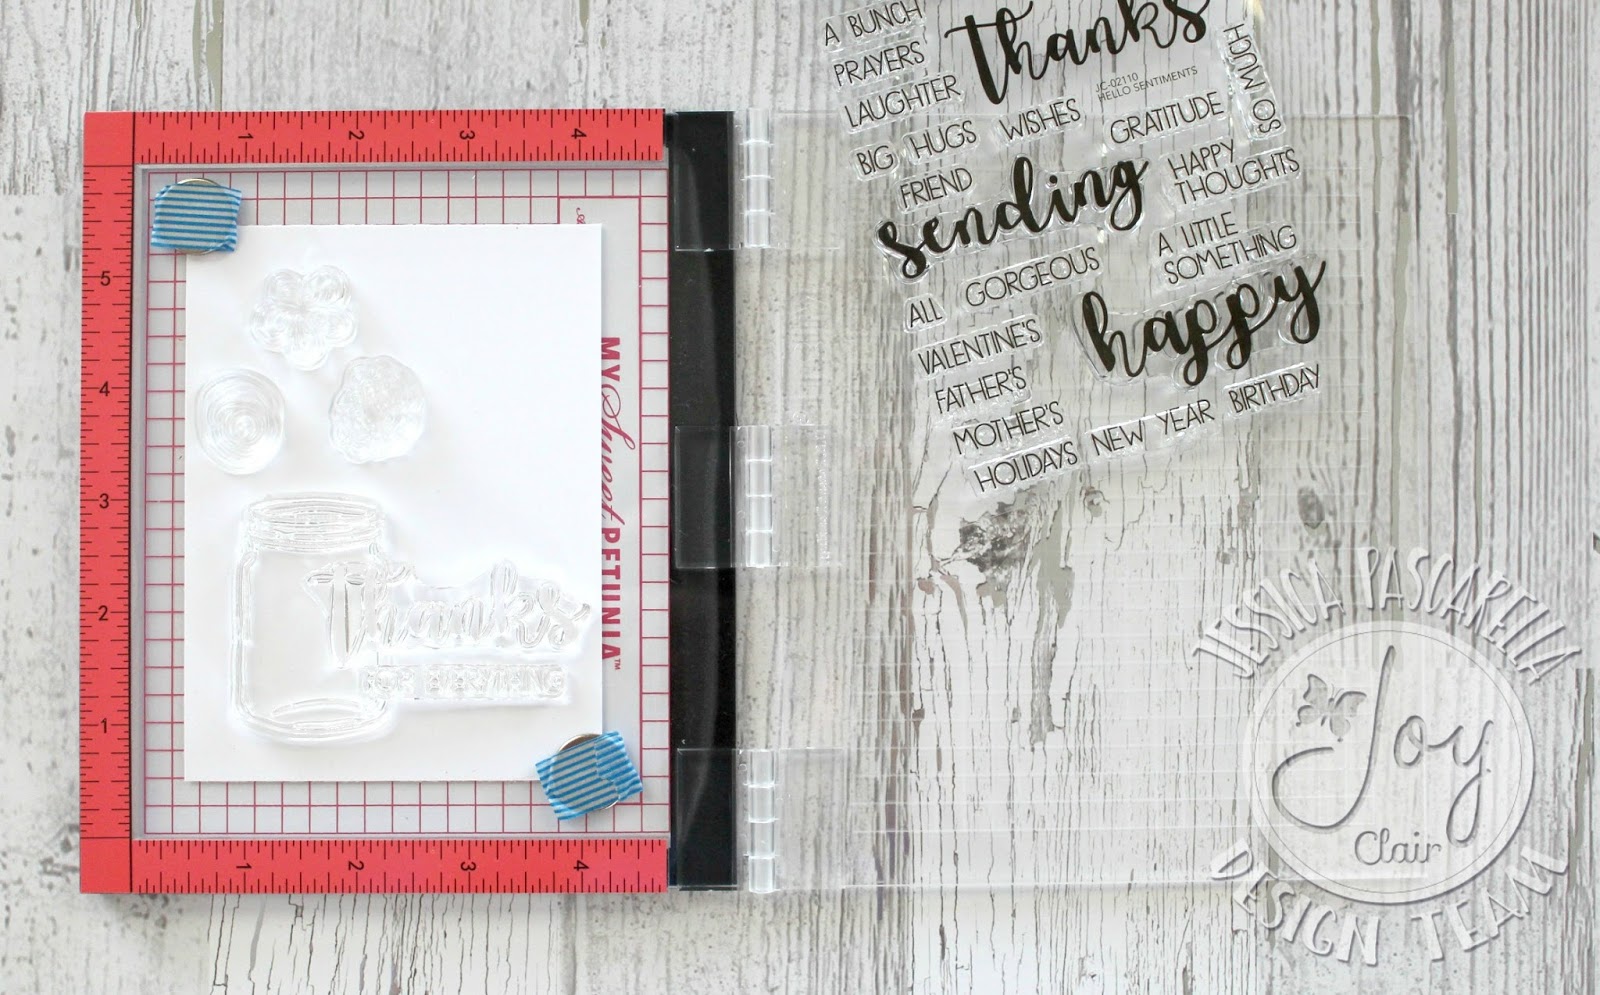
One thing I like about the MISTI tool, is that it makes it easy to work on the layout of the card. You can visualize how the stamps will look and make any changes that are needed to be made. Below, you can see that I worked with the placement of the stamps.


Now it is time to stamp the images from the Doodle Flowers stamp set.  I am planning on using different colors, so I stamp one image at a time. For now, I am only stamping the images, I plan to come back later and color in the images with the same inks.


If you have been stopping by the Joy Clair blog this month, you see that the design team is working with the 'Masking' technique. I decided to include it on this card as well. I wanted the jar to look like it is sitting on a tabletop. To achieve this, I stamped the jar image onto an extra piece of cardstock and cut the image out. The cutout is placed onto the stamped image and washi tape is place across the card. The Wood Background stamp is inked with brown ink and pressed on the card. Once you remove the tape, you can see that the wood grain image is not stamped on top of the jar.


Another thing I like about the MISTI, is that when an image does not stamp completely, you can re-ink the stamp and stamp in the exact same place, for a solid image. Below, you can see that the images from the Hello Sentiment set did not stamp correctly, so I repeated the stamping process.


To finish the card, I placed the card panel on top of a fun print and placed it onto a A2 card base.

Let's talk about prizes!!! My Sweet Petunia is giving away one MISTI and Joy Clair is giving away $25 Joy Clair gift card to two (2) lucky winners! All you have to do to increase your chances to win, is to leave a comment on each participating blog! All comments must be completed by April 9th at Midnight. The Joy Clair winners will be announce on the Joy Clair blog, Wednesday April 12.


Thank you for stopping by today! To continue along with the MISTI & Joy Clair hop, your next stop will be to the talented Stephanie's blog.

Here is the complete list of hop stops:


Supplies used on today's project:
My Sweet Petunia - Mini MISTI
Joy Clair Stamps - Doodle Flowers, Hello Sentiments and Wood Background stamp sets
My Favorite Things Inks - Cotton Candy, Poppy, Ripe Raspberry and Sour Apple
Ranger Distressed Ink - Tumbled Glass and Brushed Corduroy
Memento Tuxedo Black Ink
Echo Park - Let's Be Mermaids 6x6 paper pad

Monday, April 3, 2017

Joy Clair's SpringTime Flowers - Masking

Hello, Joy Clair friends! I don't know about you, but I love flowers. So much so, that every year I test my green thumb. And let me tell you, my thumb is more of a rotten green than a beautiful bright green! My flowers look good for a month or so and the heat of summer fries them up. I am excited about my garden this year, I am giving bulbs a try. And so far, some of them are popping up!

Today, I am showcasing the new Spring Time Flowers stamp set. I have decided to pair up the flowers with the masking technique the design team is using this month.


To start this card, I cut out an oval from masking paper using an oval die. The paper is sticky on the back, so I stuck it in the center of the card panel. I stamped the first flower on the cardstock and one onto masking paper. The masking paper flower is cut out and placed over the stamped cardstock. I stamped another flower and then removed the paper. I repeated this process until the flowers covered the entire card.


It is time to color in the flowers, I used a variety of oranges to color in the centers of the flowers. The petals are colored in with a variety of yellows. This was a simple card to create. The only real time consuming part is coloring in the flowers. You can create this card using large flower images or even small flower images.

Are you interested in learning the latest news going on with Joy Clair? Join us on your favorite Social media sites to see our newest products and samples from the design team members.
 YouTube 

So before you go, let me ask a question. What is your favorite flower? Mine is the hibiscus...all different shades of them. In fact, I just planted a couple of shrubs that are suppose have blue flowers on it when it blooms.

Thank you for stopping by today!


Supplies:
Masking Paper
Memento Tuxedo Black
Chameleon Markers


Friday, March 24, 2017

Spring Coffee Lovers Bloghop - Joy Clair Stamps

Welcome, friends! I hope you are enjoying the Spring Coffee Lovers Bloghop! There are so many talented artists joining in the fun! I am sure you are getting super inspired to go and create after this hop! If you are stopping by and interested in starting at the beginning, hop on over to the official Coffee Lovers Blog to start.


Image may contain: text
Today, I am joining some of my fellow Joy Clair design team members to showcase how with use the Joy Clair stamps for our coffee projects. You can see the team's creations on the Joy Clair blog.

For today's project, I am using the Coffee Lovers stamp set to complete a Bible Page:

 Clear Stamps - Coffee Lovers Clear Stamps - Joy Clair


To start the page, I stamped the coffee cup onto the page and also on a spare sheet of cardstock. I cut the spare cup out and placed it on top of the cup on the Bible page. This provides a mask over the cup. I stamped a few circles from the April Showers stamp set around the cup and around the page. The circles are stamped with distress inks, which react with water. So I used a wet paintbrush around the circles. The sentiment stamps are added to the Bible page. To fill in some of the empty space, I added a few of the steam stamps. To finish the page, I added watered down paint splatters around the page. Time to remove the mask on the cup! I added a few names from the Letter to God stamp set onto the coffee cup.

Let's talk about the prize! Who wants a chance to win a $25 gift card to the Joy Clair store? All you have to do is comment on this blog and all the Joy Clair design team members' blog. The winner will be announced on the Joy Clair blog at the end of the month!

Thank you for stopping by!

Jessi

Joy Clair Stamps used on today's project:

Monday, November 7, 2016

Did I Miss the Cake?

Happy Monday, friends! It is Jessi here. It is rainy here in Texas (sorry for the darker photos). How is the weather in you neck of the woods? Sorry for the Al Roker moment there, I am just really enjoying the rain! Anyway...

Today, I have a fun card to share with you. Have you seen that panda challenge that has been going around social media. It is a black and white image of a bunch of bears and you have to spot the one panda in it. Well, I was inspired to create a card from that.


I used the Wplus9's Friends for All Seasons- Fall stamp set on today's card. I used one bear image and stamped it repeatedly using the masking technique. I stamp the first bear holding the balloons and made the rest of the bears to appear behind it.

I used a variety of Chameleon markers to color in the image. I really wanted the one bear to pop off the card, so I left the rest un-colored.


You can stop by the MarkerPOP blog for the list of supplies used on today's card.

Thank you for stopping by!

Thursday, April 3, 2014

Little Tangles Challenge - Masking

Happy Thursday, everyone! I hope you are enjoying your week and finding some time to create something wonderful!
Today starts a new challenge over on the Little Tangles Challenge
 
This week is all about masking! I have to admit, I have not done this technique often. But when I think of masking, I think about creating a scene with stamps. What better Neat and Tangled set, but Little Bear.

Here is my masculine card using the masking technique:
 

I cannot wait to see the creations that you come up with! Don't forget to link up your projects HERE!
Here are a few rules about the Little Tangles Challenge:
Challenge Guidelines:
  • Create a NEW project based on the challenge theme. Your project must fit within the challenge theme in order to be eligible to win.
  • Submit your entry through the Inlinkz tool below. (If you have a blog, please link to the blog post with your challenge entry, not your entire blog!)
  • Link back to our challenge and display our challenge graphic in your blog post.
  • The use of Neat & Tangled stamps is not required, but it is strongly encouraged! If you don't own any Neat & Tangled stamps, check out the FREE digi stamps HERE
  • You may enter as many times as you'd like.
  • We'd love for you to be a follower of Little Tangles!
  • You have until Sunday, April13th at 11:59 EST to enter.

Wednesday, July 10, 2013

gel-a-tins Beary Love

Hello, gel-a-tins friends! It's Jessi here from Kissin' Krafts! 
Today I am sharing a card I made using the gel-a-tins Honey Bear stamp set! 

This card uses the Masking technique used to make it look like one stamped image is in front of another!


The first bear image is stamped onto the card. One more bear image is stamped on a spare piece of cardstock and cut out. The cut -out image is placed over the one stamped on the card. I used the Love You stamp from the Honey Bear set to form the background. The sentiment is stamped in a darker color to stand out.  The heart is from gel-a-tins Gingerbread House stamp set. The last step was my attempt at shade coloring with Spectrum Noir. I am still learning :)

Thank you for stopping by today!  We hope that you will stop by gel-a-tins FACEBOOK page and our PINTEREST page!