Showing posts with label Chameleon. Show all posts

Thursday, September 14, 2017

Fur-Friends Forever

Hello, MarkerPOP friends! Are you a pet person? If so, what is your favorite kind? I am a dog person. We currently have one dog, Olive. She is an adorable Mastiff mix. Definitely, another child I have to take care of! 

Today, I am working with the Pink & Main's Fur-Friends stamp set and Chameleon markers:


To start this card, I repeatedly stamped the bone image down the side of the card. The dog image is stamped and cut out using a circle die. The image is colored in and attached to the card. To add some extra color to the card, I added three hearts to the card. The final step for the card was to stamp the sentiment .


The following Chameleon markers were used on today's card:
BR4, BR5, RD2, RD4, YO2, YL3, NU0, NU1, NU3, PR2


Thank you for stopping by and have a wonderful day!

Jessi

Thursday, August 17, 2017

Happy Trails

Hello, MarkerPOP friends! The summer is coming to an end! School has either begun or about to begin. Why not try to fit in one last vacation or getaway? My family keeps hinting that they want to go camping. Now only if I had a camper to make that night stay easier!!!

Today I am showcasing the SugarPea Designs RV There Yet stamp set and Chameleons:


For this card, I used a variety of prints from the paper pad to paper-piece the camper. There were a few different pieces that were colored in with a few Chameleon markers. After adding a couple of the different word stamps from the set, there was some white space in one corner. I decided to cut out one of the teepee and fire and attach to the card.


The following Chameleon markers were used on today's card: 

YL2, OR4, RD2


Thank you for stopping by!

Jessi

Thursday, August 10, 2017

Sending Birthday Wishes

Hello, MarkerPOP. What is on your bucket list? I have been thinking about mine lately and keep adding to it! One thing is to take a hot air balloon ride. Have you ever been on one? I would love to...I think...not a fan of heights!

With hot air balloons on the mind, I figure I needed to create a card using the Waffle Flower's Across the Miles and Chameleon markers:


To begin this card, I stamped the balloon image onto white cardstock and colored in with a variety of Chameleon markers. The image is cut out and set aside. I wanted to add blue to the background of the card. I recently received the NUVO Embellishment Mousse and wanted to find a way to use it. I applied the cream to the card and blended it around using a baby wipe.


Once the background dried, I stamped the cloud images in grey ink. The hot air balloon is attached using foam tape. The sentiment banner is stamped at the bottom of the card with grey ink. The sentiment is stamped in black ink.


The following Chameleon markers were used on today's card:
BG4, PR4, PK3, YO3, OR4, BR2, BR4


Thank you for stopping by!

Jessi

Thursday, July 27, 2017

Hello Gorgeous


Hello, friends! Can you believe that July is almost over?!? School starts back up in less than one month. What have you been doing to fill up your days? We finally took the family to the beach today. First time this year and then we realized we never went last year. So hopefully, we can sneak in one more trip before school starts!

Today I am working with the Waffle Flower's Pretty Foliage and Chameleon markers:


So I was a little late to the MISTI fan train. I have it for some time now and just recently found out how awesome the system is! I love how you can stamp the image in the same spot repeatedly for crisper lines. Once the ink was dry, it is time to color in with Chameleon markers. I tried to use colors from the fun print below.


Once the images were colored in, the sentiment is add in the top left corner. The sentiment is colored in using orange and yellow. The panel is then attached to the printed paper and then attached to the card base.


The following Chameleon markers were used on today's card:
RD2, RD4, YG3, GR3, GR4, OL3, YL2, YO2, OR3, OR4, PK3

Thank you for stopping by! Hope you have a wonderful day!!!
Jessi

Thursday, July 13, 2017

Happy Birthday Bus

Hello, MarkerPOP friends!!! July is a busy birthday month in my family. Do you have a certain month of the year that has more birthdays than others? Another month for us is May.

Today, I am working with the Avery Elle's Birthday Bus stamp set and Chameleon markers:


To start this card, I stamped the van image onto white cardstock. The line for the road is drawn in with a black tip pen. I decided to add the presents to the top of the car and balloons above the card. I also used the black tip pen to draw in the balloon strings. To finish the scene, I added a couple exhaust puffs to the van. The sentiment is stamped at the bottom of the card in the center.


I used lots of Chameleon markers to color in the scene, I started with the balloons and worked my way down the card, saving the van for last. To finish the card, I added a some white gel marks to each of the balloon.


The following Chameleon markers were used on today's card:
NU1, NU2, NU4, BR2, BR4, BR5, YO2, YO3, YL2, BG4, BL2, BL3, BL4, PR4, YG3, GR3, RD2, RD4, BK4, CB, OR4, PK3

Please stop by the MarkerPOP blog to see the entire supply list.

Thank you for stopping by today! Have a great one!

Jessi

Thursday, July 6, 2017

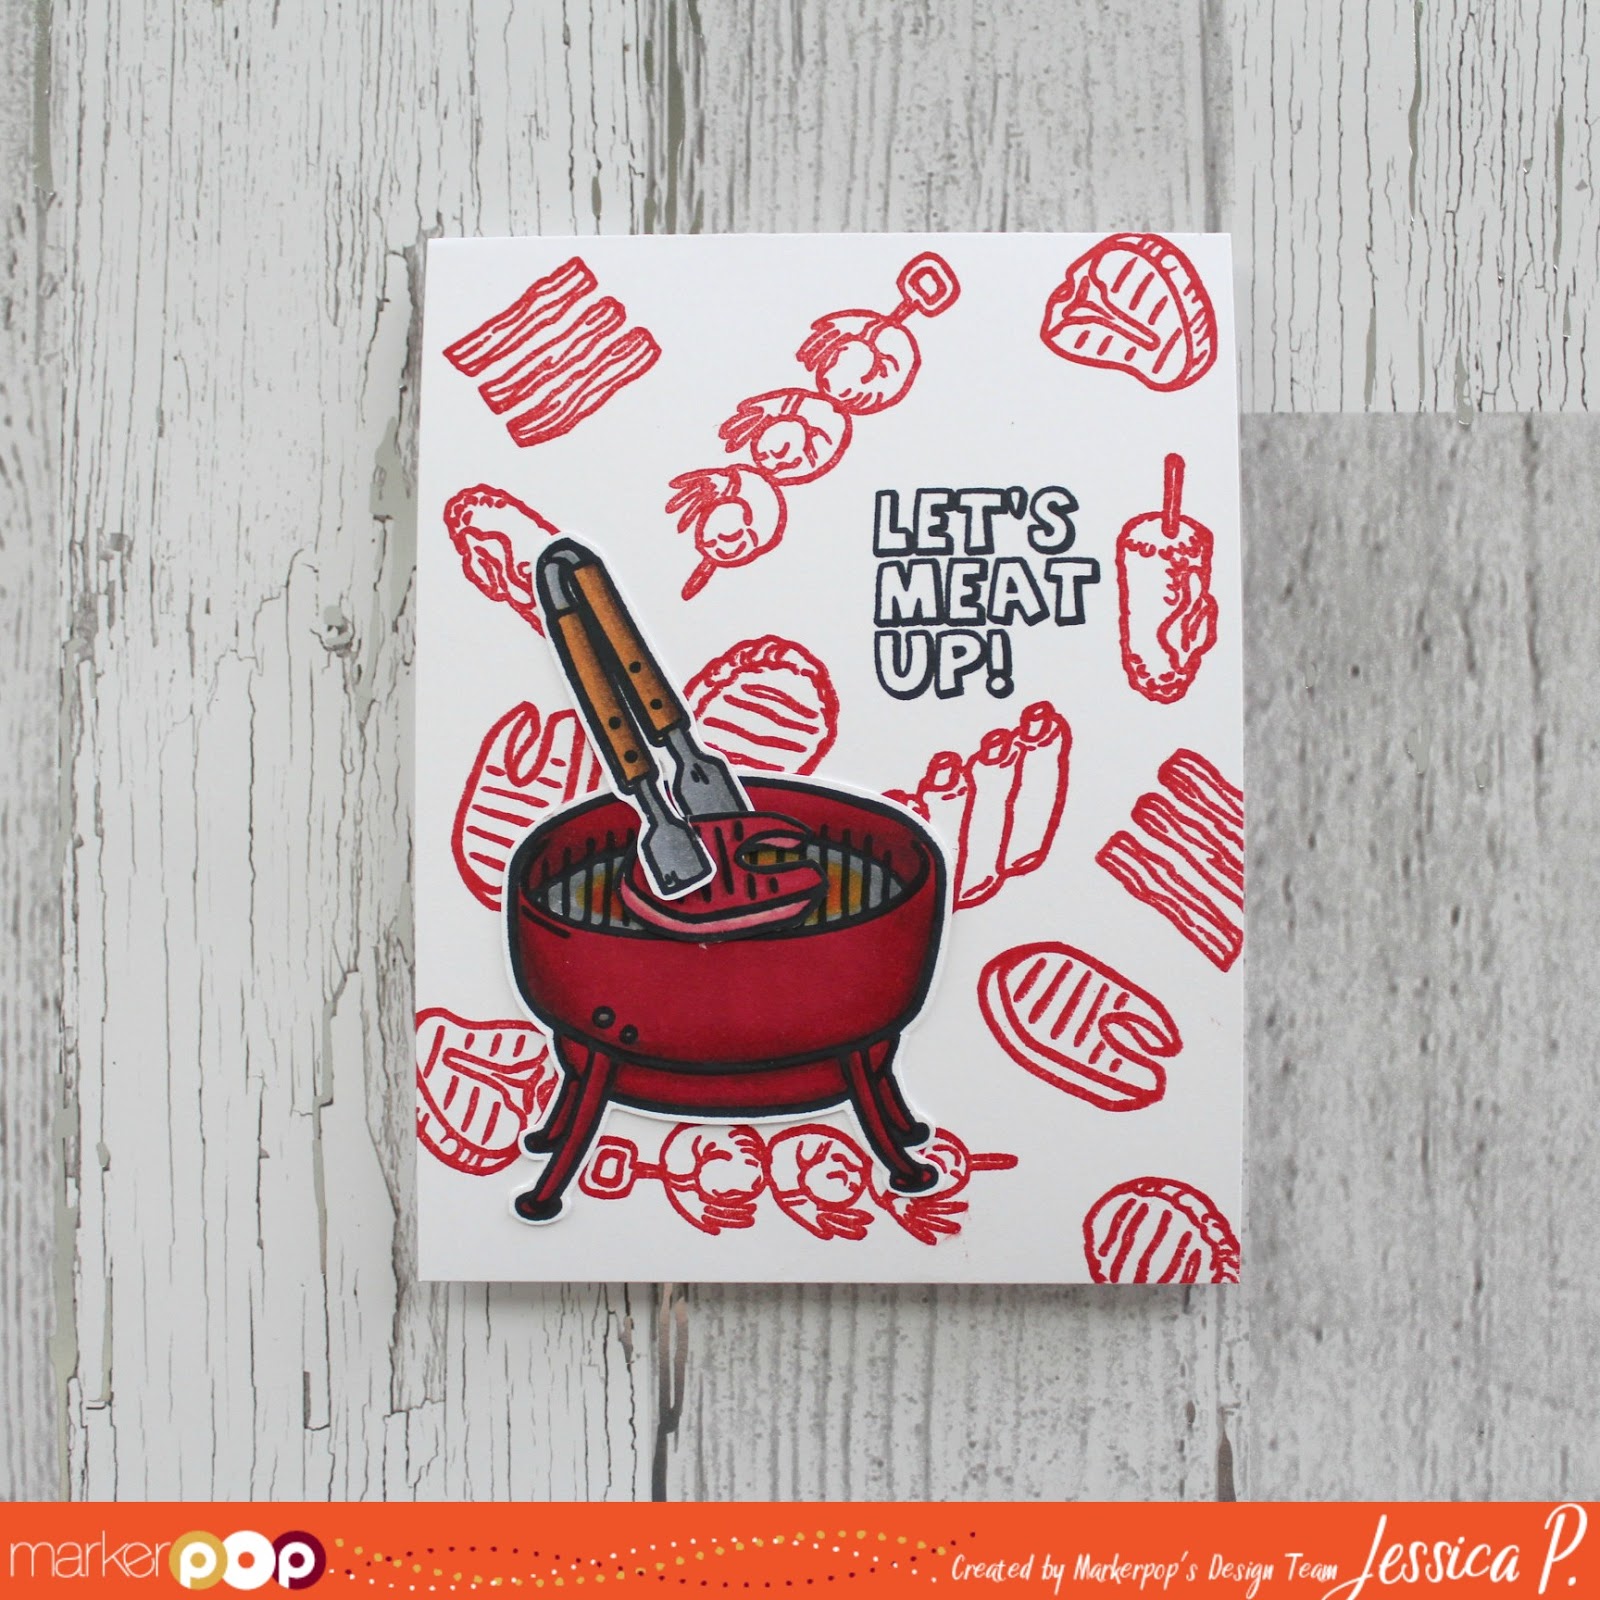
Let's Meat Up

Hello, MarkerPOP friends! I hope everyone had a wonderful 4th of July celebration! Who all BBQ'd? I know that we did...hot dogs and ribs! Yum!!! So with that in mind, I thought this week would be a great week to showcase Waffle Flower's Meat It Up stamp set.

I paired up the Meat It Up stamp set with Chameleon markers:


All the images I wanted to use on the card were stamped onto white cardstock using Memento Tuxedo Black ink. The lines on the stamps are pretty wide, so I used my MISTI tool to allow an even impression of the stamps. The images were colored in using a variety of Chameleon markers. The images were cut out and set aside.


I wanted the sentiment of the card to really pop, so I stamped it using black ink. To form the background of the card, I used red ink and stamped a variety of images from the stamp set. Once the background was complete, I attached the cut out images. The pieces are attached to make it look like the steak is cooking on the grill.


Here is the list of Chameleon markers I used on today's card:
RD2, RD4, BR4, BR5, OR3, OR4, CG5, CG8

Please stop by the MarkerPOP blog for the entire supply list.

Thank you for stopping by today!

Jessi

Friday, February 24, 2017

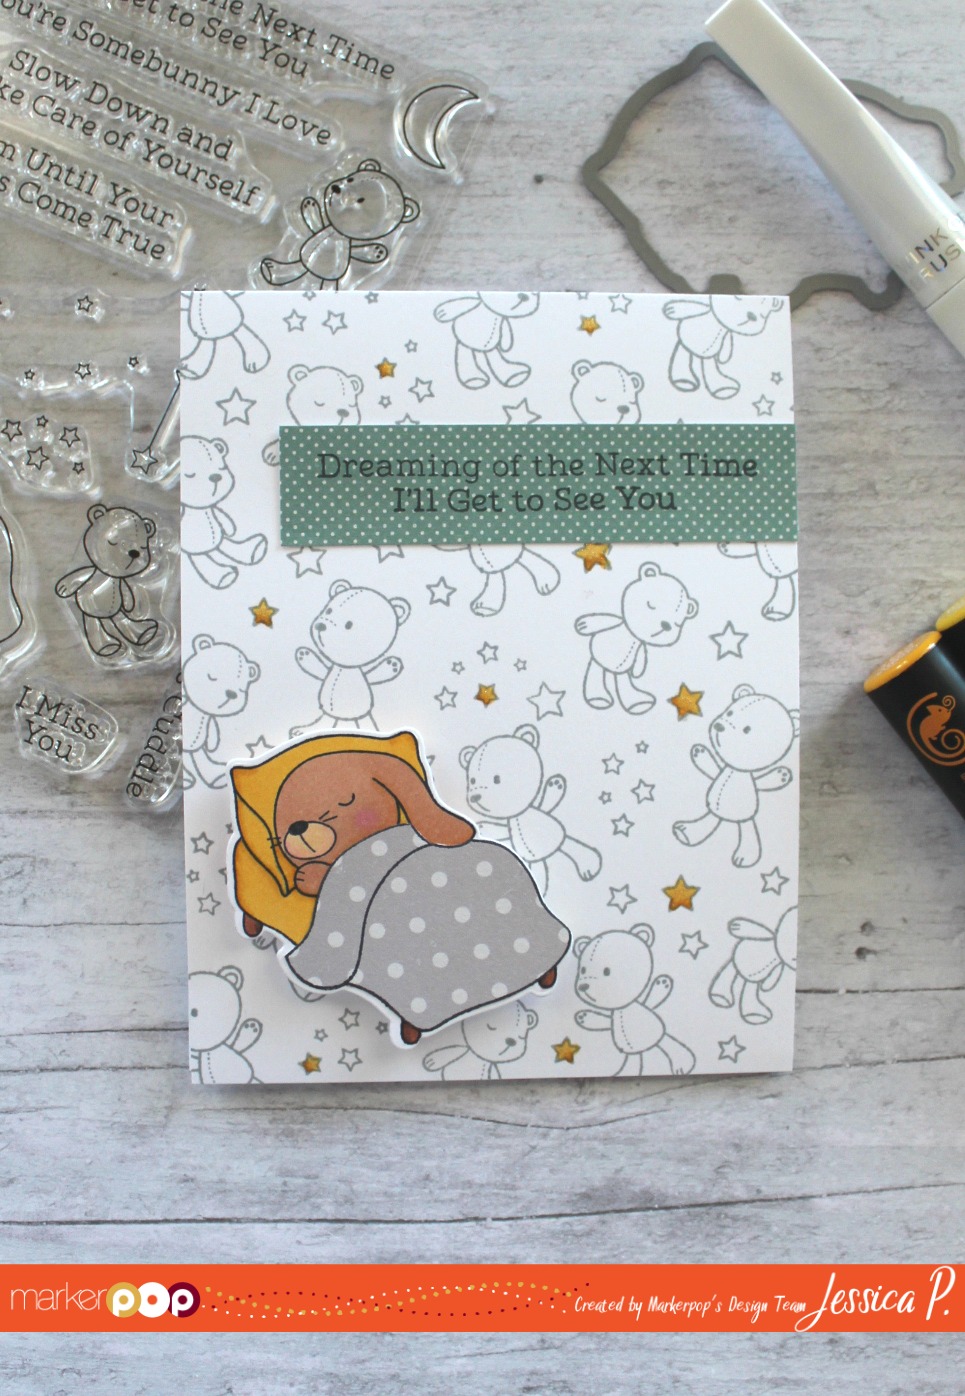
Dreaming of the Next Time

Happy Friday, MarkerPOP friends! How has your week been going? I have managed to sneak in some crafting time and cannot wait to show you the creations I have completed. But first, let's move on to today's project.

Have you seen the cute My Favorite Things' Somebunny I Love stamp set? I fell in love with this stamp set as soon as I saw it. That sleeping bunny is super adorable!


The image is cut a few times onto white cardstock. I colored in the image using Chameleon markers. I also stamped the image onto a printed paper. The blanket part of the image is cut out and attached onto the colored image. For the background of the card, I stamped the teddy bear images with gray ink. To fill in some of the empty spaces, I stamped stars. Some of the stars are colored in with yellow. Those stars are also covered with Wink of Stella-Clear to give the stars some sparkle. The sentiment is stamped onto a printed strip of paper and attached at the top of the card. The bunny image is attached to the card using foam dots.


Be sure to check out the rest of the My Favorite Things available in the MarkerPOP store!

Be sure to stop by the MarkerPOP blog to see the list of supplies used on today's project!


Thank you for stopping by and I hope you have a great day!

Friday, February 10, 2017

Poppin' in To Say Hi!!

Happy Friday, MarkerPOP friends! Are you ready for the weekend? I know that I am! Hoping to get some crafty time in between the kids' activities!

Today, I am sharing a super cute card using the Poppin' In stamp set from Waffle Flower.


To start this card, the dresser image is stamped onto white cardstock. The dresser is colored in with a variety of brown Chameleon markers. The drawer image is stamped and colored in with a variety of Chameleon markers. A stitched rectangle die is used to cut out the dresser panel. The panel is attached to a floral print from the Echo Park Just Be You paper pad. The radio is stamped on top of the dresser image. The radio is colored in with a gray marker. The drawer image is cut out and attached using foam dots. The sentiment is stamped with black ink towards the bottom of the panel. The final touch is to add a few clear drops around the card.


Isn't this such a unique stamp set? Be sure to check out the rest of the Waffle Flower products available in the MarkerPOP store!

Be sure to stop by the MarkerPOP blog to see the list of supplies used on today's project!

Thank you for stopping by and I hope you have a great day!


Friday, January 27, 2017

You're Turtley Awesome

Hello, MarkerPOP friends! It is Jessi here! Did you see Sunny Studios Stamps newest release last week? It is super adorable!

Today's project, I am pairing up the new Turtley Awesome stamp set and Chameleon markers:


I stamped the two turtles and the sentiment onto a white cardstock. The turtles are colored in with a variety of Chameleon markers. I added the three hearts at the top to fill in some of the white space. A circle die cut is used to cut out the turtles and sentiment.


The stitched circle die cut is attached to a couple prints. The panel is attached to the kraft cardbase.

Chameleon Markers used for this card: RD2, RD4, BR2, BR4, BR5, YO2, YG3, GR3, GR4


Thank you for stopping by!

Friday, January 13, 2017

Sunny Studios - Fluttering By

Hello, MarkerPOP friends! I know that most of the US is experience some winter weather, but down here along the Texas Gulf Coast, we are having Spring weather. The highs the last few days have been 80 degrees! So the bugs and little critters are coming out because they as confused as we are as to what season it actually is!

Did you see that the newest Sunny Studios release arrived in the  MarkerPOP store today? Stop over to the Sunny Studios section of the store to see the products.  I brought out one of the older Sunny Studios stamp sets, Backyard Bugs, for today's card.


I stamped the images onto white cardstock and colored in with variety of Chameleon markers. The image are cut out and set aside. I used Pink & Main's Scalloped Waves to create the hilly background. The colored images are added to the scene. The house and snail are simply attach to the card.


For the butterfly, I only put tape down the center of the back. I attached the butterfly to the card and bent the winged up for some dimension to the card. The sentiment is stamped and embossed in white on a black strip of cardstock. The sentiment is tucked underneath the edge of the butterfly.

Stop by the MarkerPOP blog to see the list of supplies used on today's card.

Once again, the new Sunny Studios release is now available in the MarkerPOP store! We hope that you stop by and check it out!


Thank you for stopping by today!

Wednesday, December 14, 2016

Little Stinker

Hello, MarkerPOP friends! It is Jessi here for a second post this week. Christmas is right around the corner, but is it too soon to have Valentine's Day on the mind? Who do you send Valentine's Day cards to? That special someone? Family? Friends?

Today, I am showcasing a CAS card using an adorable Neat & Tangled stamp set, Little Stinker:


The skunk image is stamped and colored in. The coordinating die is used to cut out the image. The coordinating die set also includes a tiny heart die. I used the die to cut out three hearts. I attached a red piece of cardstock underneath the white cardstock. The panel is then attached to the card front. A fun stripe print is added at the bottom of the panel. The skunk is attached and a sentiment is stamped above the printed paper.


To add some more detail to the card, I used a Wink of Stella pen to add glitter touches to the hearts on the card.


Please stop by the MarkerPOP blog for the list of supplies used on today's project!

Thank you for stopping by today!

Jessi
Monday, December 12, 2016

You Are the Swan for Me

Hello, MarkerPOP friends! Did you see Avery Elle's newest release? It is simply adorable! You can see it in the Avery Elle section in the MarkerPOP store.

Today, I am working with the new Swans stamp set:


The swan image is stamped onto white cardstock and colored in with Chameleon Markers. The image is cut out and set aside. I used a rectangle die to start the panel on the card. I created the waves using a border die and added the layers to the panel. The swan image is added in between the waves.


To add some additional detail to the card, I stamped the tiny hearts into the white space of the card. I used NUVO Drops to color in the hearts. To finish the card, a sentiment is stamped towards the bottom of the card.


Please stop by the MarkerPOP blog to see the list of supplies used on today's project.

Thank you for stopping by!

Monday, November 7, 2016

Did I Miss the Cake?

Happy Monday, friends! It is Jessi here. It is rainy here in Texas (sorry for the darker photos). How is the weather in you neck of the woods? Sorry for the Al Roker moment there, I am just really enjoying the rain! Anyway...
Today, I have a fun card to share with you. Have you seen that panda challenge that has been going around social media. It is a black and white image of a bunch of bears and you have to spot the one panda in it. Well, I was inspired to create a card from that.


I used the Wplus9's Friends for All Seasons- Fall stamp set on today's card. I used one bear image and stamped it repeatedly using the masking technique. I stamp the first bear holding the balloons and made the rest of the bears to appear behind it.

I used a variety of Chameleon markers to color in the image. I really wanted the one bear to pop off the card, so I left the rest un-colored.


You can stop by the MarkerPOP blog for the list of supplies used on today's card.

Thank you for stopping by!

Wednesday, November 2, 2016

Tis the Season

Hello, MarkerPOP friends! It is Jessica P. here and I am sharing a very simple CAS card with you today! Stamp, color and finish. How easy is that?


The wreath image is stamped onto the front of the card base with black ink. Once the ink dried, I used a variety of Chameleon markers to color in the image. I used several different greens to highlight the different elements within the wreath. Touches of red and yellow complete the wreath.


Please stop by the MarkerPOP blog for a full list of supplies used to make today's card!


Thank you for stopping by! Hope you have a great day!

Jessi