Wednesday, November 30, 2016

Sunny Studio - Mug Hugs

Hello, MarkerPOP friends! It is Jessi here. My husband surprised me with a trip to Colorado last week and I got to stick my hand in some snow! So coming back to reality and 80+ degrees, I found myself dreaming of a hot cup of chocolate back in snowy Colorado!

I decided to cave into the cravings with the adorable Sunny Studio's Mug Hugs stamp set:


I started with a solid white cardstock and stamped the mug images all over the card. To cover in some of the empty spaces, I stamped a snowflake image and the tiny heart image also included in the Mug Hugs stamp set.


I wanted the card to remain simple. However, I wanted to add some color to the card. I used the Red Zig Clean Color marker to color in the hearts. I used the Stella Wink - Clear to add the glittery sparkle to the snowflakes and the top of the heart. The sentiment phrases were stamped onto the front of each mug.


Please stop by the MarkerPOP blog for the list of supplies used to create this card.

Thank you for stopping by! Have a great day!

Jessi

DCWV & Eileen Hull Blog Hop

Hello, friends! I am joining the DCWV and Eileen Hull blog hop today. You can see the design team members' projects on the DCWV blog and the Eileen Hull blog.

Today, I used the Eileen Hull Twist & Style tool and the DCWV Cranberry Christmas stack to create some simple tree ornaments.


To begin the project, I used a star shape die and cut two of each print. I covered one star with adhesive on the back side of the paper.  I attached some of the twisted wire in a hoop shape. I attached the second star to create the ornament.


A stitched circle die cut is attached to the front of the star.


To finish the ornament, I used die cut words and attached on top of the circle. Such an easy ornament to recreate!

Thank you for stopping by! Have a great day!

Jessi

Saturday, November 26, 2016

Welcome Little One - girl

Hello, Pink & Main friends! I love making baby cards, but don't have the opportunity to make them too often. I recently found out that I will be an aunt again and am excited to hold that baby in my arms. But sadly, I have to wait a few more months!

Today's project uses an older Pink & Main set, Little Ones. In the November Release, the coordinating dies for Little Ones were included.


To create this square card, I used the new Stitched Rounded square dies. I also used the same dies to create the frame. The elephant image from Little Ones is stamped and colored on white cardstock. The image is cut out using the coordinating dies. For the sentiment, I used the fancy frame die from the Little Ones collection and stamped 'Welcome' on it. The rest of the sentiment is stamped onto the frame.


The elephant image can be used on a boy card, by replacing the pinks with blues!

Thank you for stopping by today! Have a great one!


Tuesday, November 22, 2016

Donut Birthday - Neat & Tangled

Hello, MarkerPOP friends! Have you ever had donuts instead of cake for your birthday? I haven't! But I think I need to change that on my next birthday. All these pictures of donut cakes are making me want one!

Today, I am working with the Neat & Tangled's Say Yes to Donut stamp set. I paired up the stamps with the Simple Stories So Fancy 6x6 paper pad:


The donut image is stamped onto white cardstock. The image is colored in with a variety of Chameleon markers. The image is cut out using a stitched circle die. I used a couple of different prints from the paper pad to finish the card. The floral print is used to cover the front of the card. The purple print is cut with a stitched rectangle die. The sentiment is stamped onto a yellow print and attached to towards the bottom part of the purple. The circle die is attached towards the top.


The stamped image is stamped in black ink. This made the sprinkles black. I covered the black part with a white gel pen to turn the sprinkles to white.


Please stop by the MarkerPOP blog for the list of markers and supplies I used to create this card.

Thank you for stopping by today! Hope you have a great one!


Monday, November 21, 2016

DCWV Merry Christmas

Hello, DCWV friends! Are you ready for the holidays? They are right around the corner!!! Have you decorated yet? I know that some people decorate before Thanksgiving, but I am one that waits until the next day.

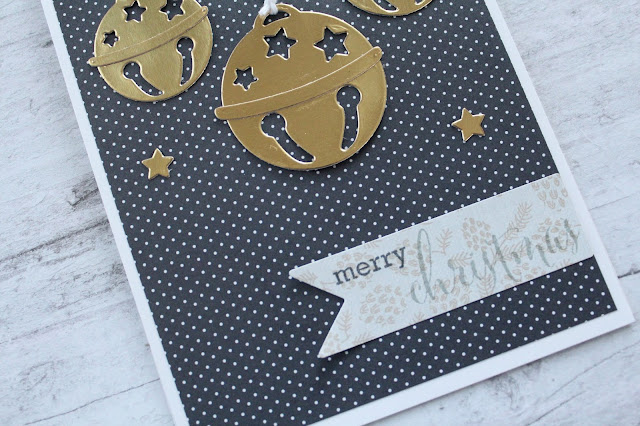
Today I using the new DCWV All About Christmas stack:


This stack is full of awesome prints! I wanted to make a CAS card that highlighted one of the prints.


I paired this card up with some DCWV foil cardstock and cut out some ornaments using a die cut machine. The ornaments are hanging with strings of twine. A few stars are added around the card for extra embellishments.


The sentiment is stamped onto a printed pendant. This fun print is also in the stack. The sentiment is stamped in grey and black to help it POP.

Thank you for stopping by today! Hope you have a wonderful day!

Jessi

Saturday, November 19, 2016

Hang in There Scene

Happy Saturday, Pink & Main friends! We are getting our first taste of winter here in Texas. Perfect weather for the upcoming holiday!

Did you see the new Pink & Main November release? One word---ADORABLE! Sloths are so popular right now! Who saw Zootopia? Flash the Sloth was my favorite character!

For today's project, I am pairing up the Sloth stamp set with the oversized Stitched Oval dies.


I wanted to create a scene using a sloth image. I stamped the image and colored with a variety of markers. The image is cut out with the coordinating Sloth dies. I wanted the scene to look like the sloth was hanging out in a tree. I used some leaves and branches diecuts to create the background of the scene. The sloth image is attached on top of the scene. The simple sentiment is stamped towards the bottom of the card.


We would love to see you Pink & Main creations! Join the Pink & Main Facebook gallery and upload your projects!

Thank you for stopping by today!


Thursday, November 17, 2016

He Gives to All of Them - Joy Clair

Hello, Joy Clair friends! It is Jessi here and I an excited to share a couple projects made using stamps from the November release. If you did not see the release, you can see the new stamp sets, HERE!

First up is my latest Bible journaling page. I used the new Color by Faith's Three Wise Men stamp set on this page:


Next up is the card I made using the Holly Jolly Santa stamp set:


Want to learn more about these projects? Stop by the Joy Clair blog for more details!

Thank you for stopping by today!

Have a wonderful one!
Jessi


Inspired by Stamping - Layered Windows

Hello, Inspired by Stamping friends. It is Jessi here for my last guest designer spot. I want to start off by thanking Joanna and the team for allowing me to play along with them this month! It has been a pleasure working with you!

I love creating layered windows on cards. So I decided to show you how to complete one with Inspired by Stamping stamp sets:


The first step is to form your A2 card base and cut our a 4in. x 5.25in panel that will be the front of the card. With this panel, use a circle die to cut out the window.


I took the forest stamp from the Winter Friends stamp set and stamped the image twice onto the cardbase. I used a grey ink, so the inks would blend into the scene. I used a light blue to color in the sky portions of the stamp.


The deer image is stamped in a brown ink and colored in with a variety of brown markers. A black marker is used to color the hooves and the tip of the nose.The image is cut out and set aside.


The front panel is flipped over and the snow drift and tree dies are attached to the back side of the window. Several foam dots are attached around the card. The panel is then attached to the cardbase.


The deer image is attached to the scene, tucked behind the die cut trees.  A simple sentiment from the Inspired by Stamping stamp set Poinsettias is stamped onto glitter paper and attached to the card.


Thank you for stopping by today and I hope you have a great day!

Supplies:
Inspired by Stamping - Poinsettias and Winter Friends
Spellbinders Circle Dies
CC Designs Tree Die
Pink & Main Scalloped Wave Die
DCWV Glitzy 6x6 pad
Neenah Solar White Cardstock
Chameleon Markers
Spectrum Noir Markers
Memento Ink - Rich Cocoa and London Fog
Foam Dots

Wednesday, November 16, 2016

Merry Christmas Packages

Hello, MarkerPOP friends! It is Jessi here. Are you ready for the holiday season? Can you believe that it is right around the corner?

Today, I am sharing a CAS Christmas card that would be simple to recreate in mass numbers and send out to your closest family and friends:


To make the card unique, I used a scalloped edge die to create the card base. The image from the Avery Elle's Christmas Packages stamp set is stamped and colored in with a variety of markers. The image is then cut out using a tag die. The tag is attached to the card and the sentiment is stamped around the tag.


Check by the MarkerPOP blog to see what markers were used on this project!


Thank you for stopping by! Have a wonderful day!

Jessi

Saturday, November 12, 2016

Pink & Main's Fur Friends

Happy Saturday, Pink & Main friends! It is Jessi here from the Pink & Main design team. Did you see that the new November release. The release includes some super adorable stamp sets and tons of new dies. I have to be honest...I am in love with the oversized dies! Perfect for shaped cards!

Today, I am working with the Stitched Circle Dies and the Fur Friends stamps and coordinating dies:


I used the largest circle die to create the card base. Two circles are cut out of heavy cardstock and attached at the top. I used the large circle one more time on a print to cover the front. The next part of the card is created using the circle 2 sizes smaller. I stamped the cat image onto cardstock and colored in with a variety of markers. The sentiment is stamped onto a pendant die.


Thank you for stopping by and have a great day!
Jessi

Wednesday, November 9, 2016

ADORNit ArtPlay Bible Page

Hello, ADORNit friends! How is your Thursday going? One day closer to the weekend! And what a weekend to look forward to! Our first fall temperature weekend here near the Gulf of Mexico.

Today, I have a fun Bible page to share with you today. I paired up some of ADORNit stickers with one of their ArtPlay Paintables.


So I started this page with the simple paintable. I used a variety of markers to color in the image. I used washi tape to attach the ArtPlay paintable card into the Bible. I felt the page needed a little more, so I used some of ADORNit's floral stickers. The stickers include individual pieces of the flower, allowing you to build your own flower. I used a few extra pieces to fill in the empty spaces on the page.


Please stop by the ADORNit Amazon store to see their latest collections!

Thank you for stopping by and have a great day!
Jessi - ADORNit Ambassador

Tuesday, November 8, 2016

Inspired by Stamping - Guest Designer Pt. 1

Hello, Inspired by Stamping friends! My name is Jessica Pascarella and I am excited to be the November guest designer! I want to start off my saying 'Thank You' to Joanna for this opportunity and I look forward to working with the team this month!

I have two cards to share with you today. I created a some fall-themed cards, highlight some of my favorite Inspired by Stamping stamp sets.

First up, is a card I made using the Autumn Harvest stamp set.


I stamped the barrel and apple images with a brown ink. Once the ink dried, I used a variety of markers to color in the image. The image is cut out onto a diecut tag. A burnt orange ribbon is stapled onto the top of the tag. The tag is then attached to a variety of fall printed paper. A simple sentiment is formed using the stamps from the Autumn Harvest stamp set.

Next up is my project using the Autumn Blessings stamp set:


To start off this card, I stamped the pumpkin image repeatedly onto the cardstock. The green leave is stamped onto each pumpkin. A yellow ribbon is attached around the bottom of the pumpkin panel and attached to a brown printed paper and then attached to the card base. A fancy diecut is used for the sentiment. The sentiment is stamped in brown. To fill in some of the empty space, I stamped a branch image in two corners using a golden brown ink.

Once I again, I am excited to be with you for the next month. I will be back soon with more Inspired by Stamping creations. You can hop on over to my blog, Kissin' Krafts to see more of my creations.

Thank you for stopping by today!

Inspired by Stamping Supplies:


Monday, November 7, 2016

Did I Miss the Cake?

Happy Monday, friends! It is Jessi here. It is rainy here in Texas (sorry for the darker photos). How is the weather in you neck of the woods? Sorry for the Al Roker moment there, I am just really enjoying the rain! Anyway...

Today, I have a fun card to share with you. Have you seen that panda challenge that has been going around social media. It is a black and white image of a bunch of bears and you have to spot the one panda in it. Well, I was inspired to create a card from that.


I used the Wplus9's Friends for All Seasons- Fall stamp set on today's card. I used one bear image and stamped it repeatedly using the masking technique. I stamp the first bear holding the balloons and made the rest of the bears to appear behind it.

I used a variety of Chameleon markers to color in the image. I really wanted the one bear to pop off the card, so I left the rest un-colored.


You can stop by the MarkerPOP blog for the list of supplies used on today's card.

Thank you for stopping by!

Saturday, November 5, 2016

Tickled Pink

Hello, Pink & Main friends! I hope you are having a wonderful Saturday! Can you believe that it is November and Christmas is around the corner?!? Today, I am trying to get into the holiday spirit and work with some super adorable Pink & Main goodies!

The stamp set I am working with Oh, Deer stamp set:


I love the "Tickle Pink for Christmas" sentiment included in the stamp set. I focused my card on that one sentiment. I chose some pink prints to layer onto the card front. I used the Rounded Rectangle dies on one of the prints. The flamingo image is stamped onto cardstock and colored in with colored pencils. The image is cut out using the coordinating die. The sentiment is stamped onto another pink print. Such an easy card to re-create!


Did you see this month's Pink & Main challenge? It is all about being thankful and gratitude. You can join in the fun here!  Need some inspiration? Here is my card for the challenge:


Thank you for stopping by!
Jessi

Friday, November 4, 2016

Joy Clair's Three Wise Men and More

Hello, Joy Clair friends!  Can you believe that it is Friday?!? Where did the week go? Before you know it, we will be in the full swing of the holidays! Have you started shopping? I have...just trying to proactive!

Did you see Joy Clair's newest stamps? Perfect for you holiday crafting! Today, I am showcasing two of the stamp sets. One from the everyday line and one from their Color by Faith line.

First, up is the adorable Three Wise Men stamp set:


What to learn more about these projects? Stop by the Joy Clair blog to find out the details!

Thank you for stopping by! Have a great day!

Jessi

Thursday, November 3, 2016

DCWV November Stack-a-holic Challenge

Who is ready for another DCWV Stack-a-holic challenge?

Here is this month's card sketch:


I decided to work with one of DCWV's new holiday stacks, Cranberry Christmas Stack, now available at Michaels stores.


What to see more design team members inspiration and learn more about how to enter, please stop by HERE!

Thank you for stopping by!


Wednesday, November 2, 2016

Inspired by Stamping November Release Blog Hop

Hello, friends! I am excited to be a guest designer for Inspired by Stamping. I am joining them for the month of November. First up is their November Release blog hop.


If you have been hopping along with them, you should be arriving from the talented Linsday's blog. If you happened upon my blog and would like to start at the beginning, you can start at Joanna's blog.

Inspired by Stamping is releasing three stamp sets this month. First up is the new Snowflakes stamp set. I have two projects today showing how you can use this amazing stamp set.


I love to emboss snowflakes. I decided to use white embossing powder on a navy cardstock. This allows the snowflakes to really pop off the project. To start this project, a banner diecut is cut out of the cardstock. I stamped the different snowflake images onto the cardstock and covered it with the embossing powder. Some loose powder is sprinkled over the empty spaces. A heat gun is used to heat up the powder. The sentiment is stamped onto a diecut and the same embossing technique was used. A pretty blue twine was added beneath the sentiment. I used the navy ribbon from the __________ ribbon set to from the tag.


I used the same embossing technique on this card, but with gold powder. The sentiment is added to a strip of cardstock and attached to the front of the card. I layered the embossed cardstock on top of a striped vellum piece of paper.

Did you see the amazing giveaway going on? Make sure you comment along the way for your chance to win!


There is also a great promotion going on in the shop!


Thank you for stopping by! We hope you had a great hop and was inspired to go get

Snowflakes Blog Hop- November 2nd
Jessica  (You are here)

Joy Clair November Release Blog Hop

Welcome to the Joy Clair November Release Blog Hop!
Joy Clair is releasing some amazing new stamp sets today!


The design team has been working hard with some new creations to show the new sets off! You should be arriving from Martha's blog.If you are stopping by my blog and would like to start at the beginning, please stop by the Joy Clair blog.

Joy Clair’s November release contains four stamp sets, two everyday sets and two sets from their bible journaling line, Color by Faith!
All the stamps from this release will be on sale starting today.

Today I am showing off the new Color by Faith's A Child is Born:

The image of Mary is stunning. I wanted to keep the design simple and have the image really pop off the page. I stamped the image in black ink and allowed it to dry. I used ZIG Clean Color Real Brush markers to form the watercoloring on the page. The word phrases are stamped in black ink. Such a simple and easy page to recreate!


Now let’s talk about the grand prize! There will be TWO winners from the blog hop. Each winner will receive $25 Joy Clair gift certificate. WHAT A PRIZE!!!
1. Comment on the Joy Clair blog and the blogs of each participate along the way!


You have until November 5th, 2016 at noon EST. The winners will be announced on November 30th.
Thank you for stopping my blog! Your next stop will be the talented Cornelia's Blog!

Hop with us. Be sure to visit each of the designers on this blog hop!

Tis the Season

Hello, MarkerPOP friends! It is Jessica P. here and I am sharing a very simple CAS card with you today! Stamp, color and finish. How easy is that?


The wreath image is stamped onto the front of the card base with black ink. Once the ink dried, I used a variety of Chameleon markers to color in the image. I used several different greens to highlight the different elements within the wreath. Touches of red and yellow complete the wreath.


Please stop by the MarkerPOP blog for a full list of supplies used to make today's card!


Thank you for stopping by! Hope you have a great day!

Jessi